scroll text to advance content . click image to zoom & drag to pan
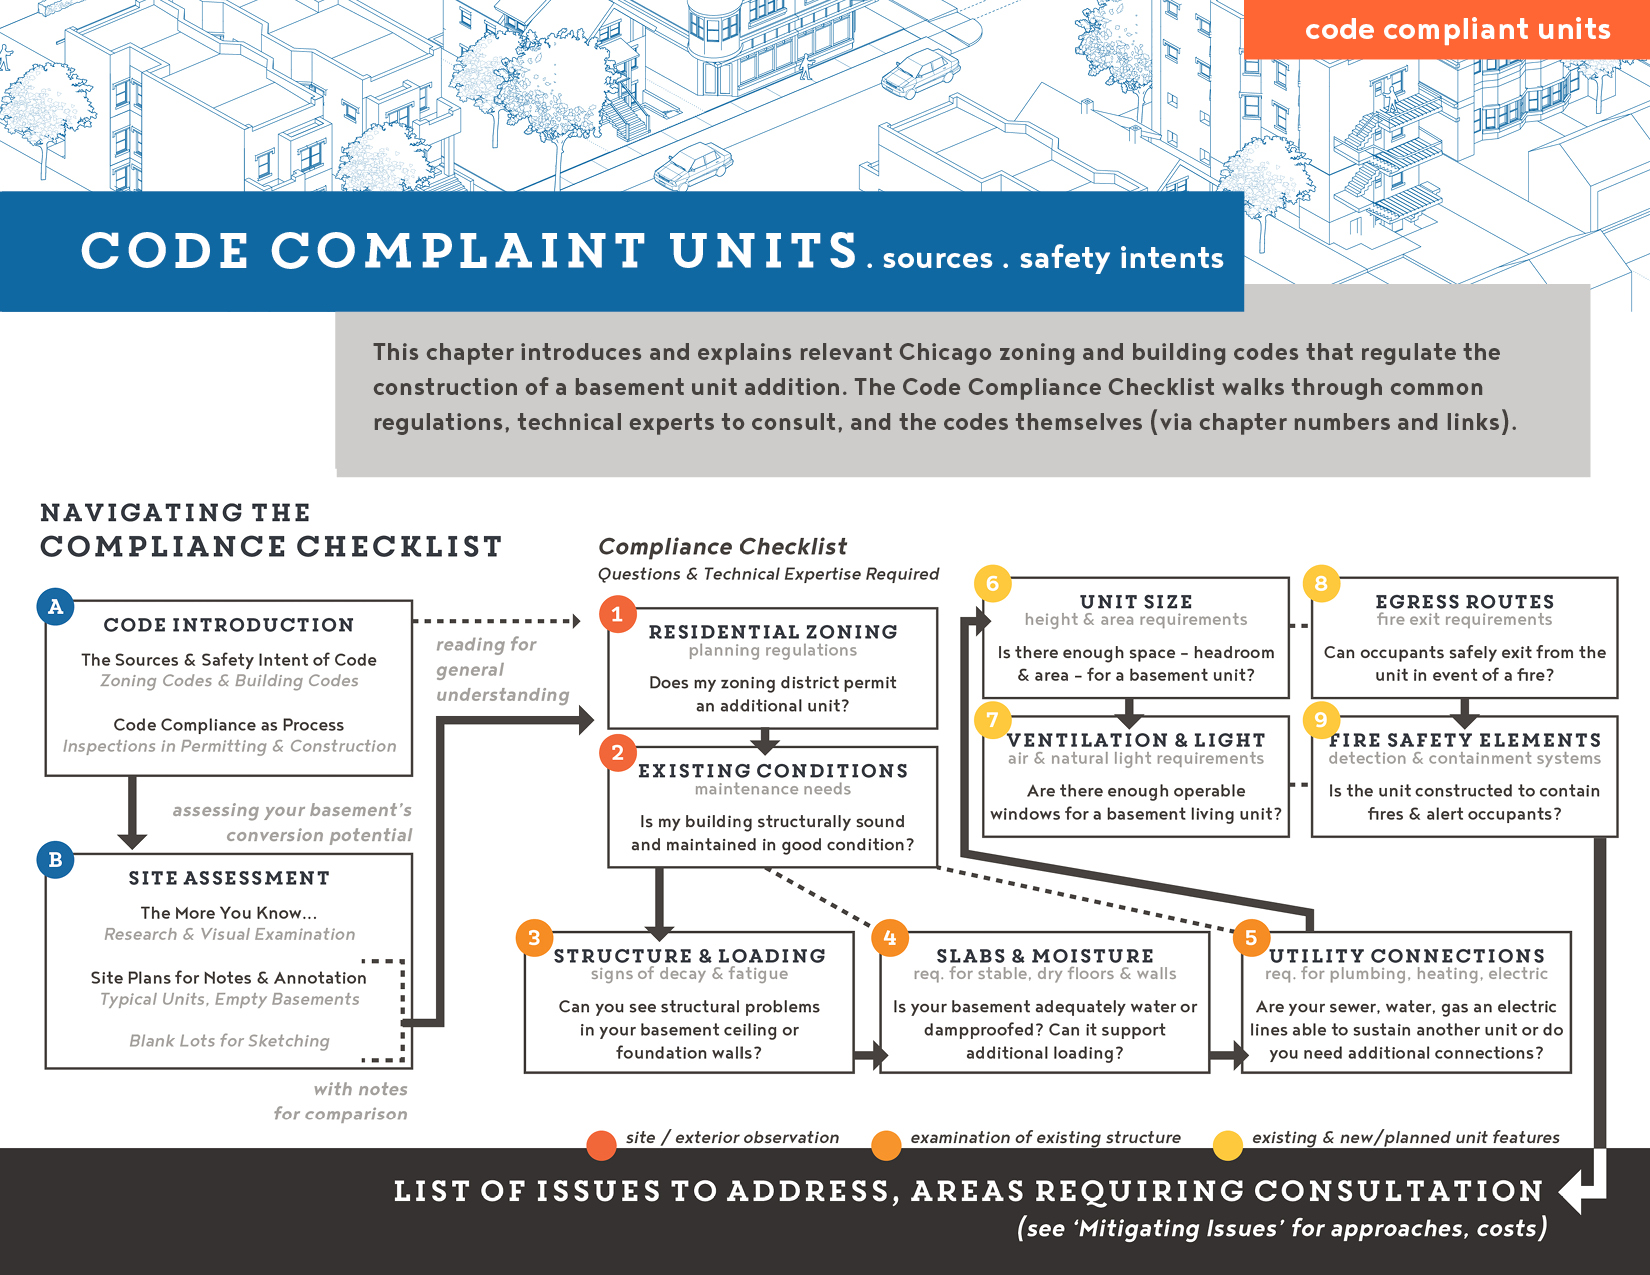
Code Compliant Units chapter introduces and explains relevant Chicago zoning and building codes that regulate the construction of a basement unit addition. The Code Compliance Checklist walks through common regulations, technical experts to consult, and the codes themselves (via chapter numbers and links).
Code Compliant Units
Chapter Contents
The ‘Code Compliant Units’ chapter helps you understand likely construction issues and challenges to safe inhabitation. The body of the chapter, the Compliance Checklist, elaborates on the specific relationships between observed site conditions and Chicago Code requirements.The typical examples are based on the Two-Flat and Cottage conversions introduced in the prior chapter, with common lot sizes and Chicago construction details (i.e. brick) to anticipate issues.
In advance of the code checklist, the following pages introduce:
-
A the safety intent of Chicago’s Codes,
as well as pending updates -
A the process of inspection,
in determining code compliance, and -
B assessment ‘template’ drawings,
which you can use when observing your basement and site - taking measures, jotting down notes, tallying building aspects which require expert consultation
This section should enable you to identify issues with your existing building and planned basement unit that require technical expertise for assessment, mitigation, or design coordination. The ‘Mitigating Issues’ chapter will expand on the key factors behind different repairs required to meet code and provide basic budgets. Between the two sections, you should have enough information to either a) decide not to pursue a basement unit or b) start a focused and realistic conversation with an architect on designing and developing a basement unit.
chicago’s codes:
Any building within the City of Chicago is regulated under two sets of standards - the Municipal Zoning Ordinance and the Construction Codes - which establish the minimum requirements for land use and building construction. Their collaborative aim is the protection and promotion of public health, safety, and welfare.
The Zoning Ordinance, Chapter 17 of Chicago’s Municipal Code, covers the zoning of land uses. It also establishes the number of units allowed per building, building height, building placement within a lot, and parking and open space requirements.
Code Updates - As of December 16, 2020, the ‘Additional Dwelling Units Subsistute Ordinance’ was adopted by City Council. Starting May 1, 2021 it allows for the creation of additional basement units in select pilot areas (thru May 31, 2024). This manual outlines a) the existing citywide zoning controls and b) the revised pilot rules and areas, so owner-occupants in either situation can determine basement unit potentials.
The Chicago Construction Codes, Chapter 14A-X and 18 of the Municipal Code, are a collection of codes, which establish minimum standards for material and structural performance, interior finishes and fixtures, and life and fire safety protection for the structure and occupants. Drawn and adapted from trade standards and the International Building Code, the full series regulates the construction, demolition, maintenance, rehabilitation, relocation, and use and occupancy of buildings, structures, and adjacent outdoor areas. Working at a smaller scale than zoning, the construction codes set minimum standards to protect occupants, visitors, and adjacent structures from the hazards of structural failure, fire, etc.
Code Updates - The Chicago Construction Codes were updated in 2019. They have been phased in since July 1, 2019, with early compliance of new buildings on December 1, 2019. (14A-1-105) As of August 1st 2020, all permits for new construction or alterations (without prior and ongoing phases) must be compliant with the new 2019 code. This manual is written to conform to the 2019 regulations.
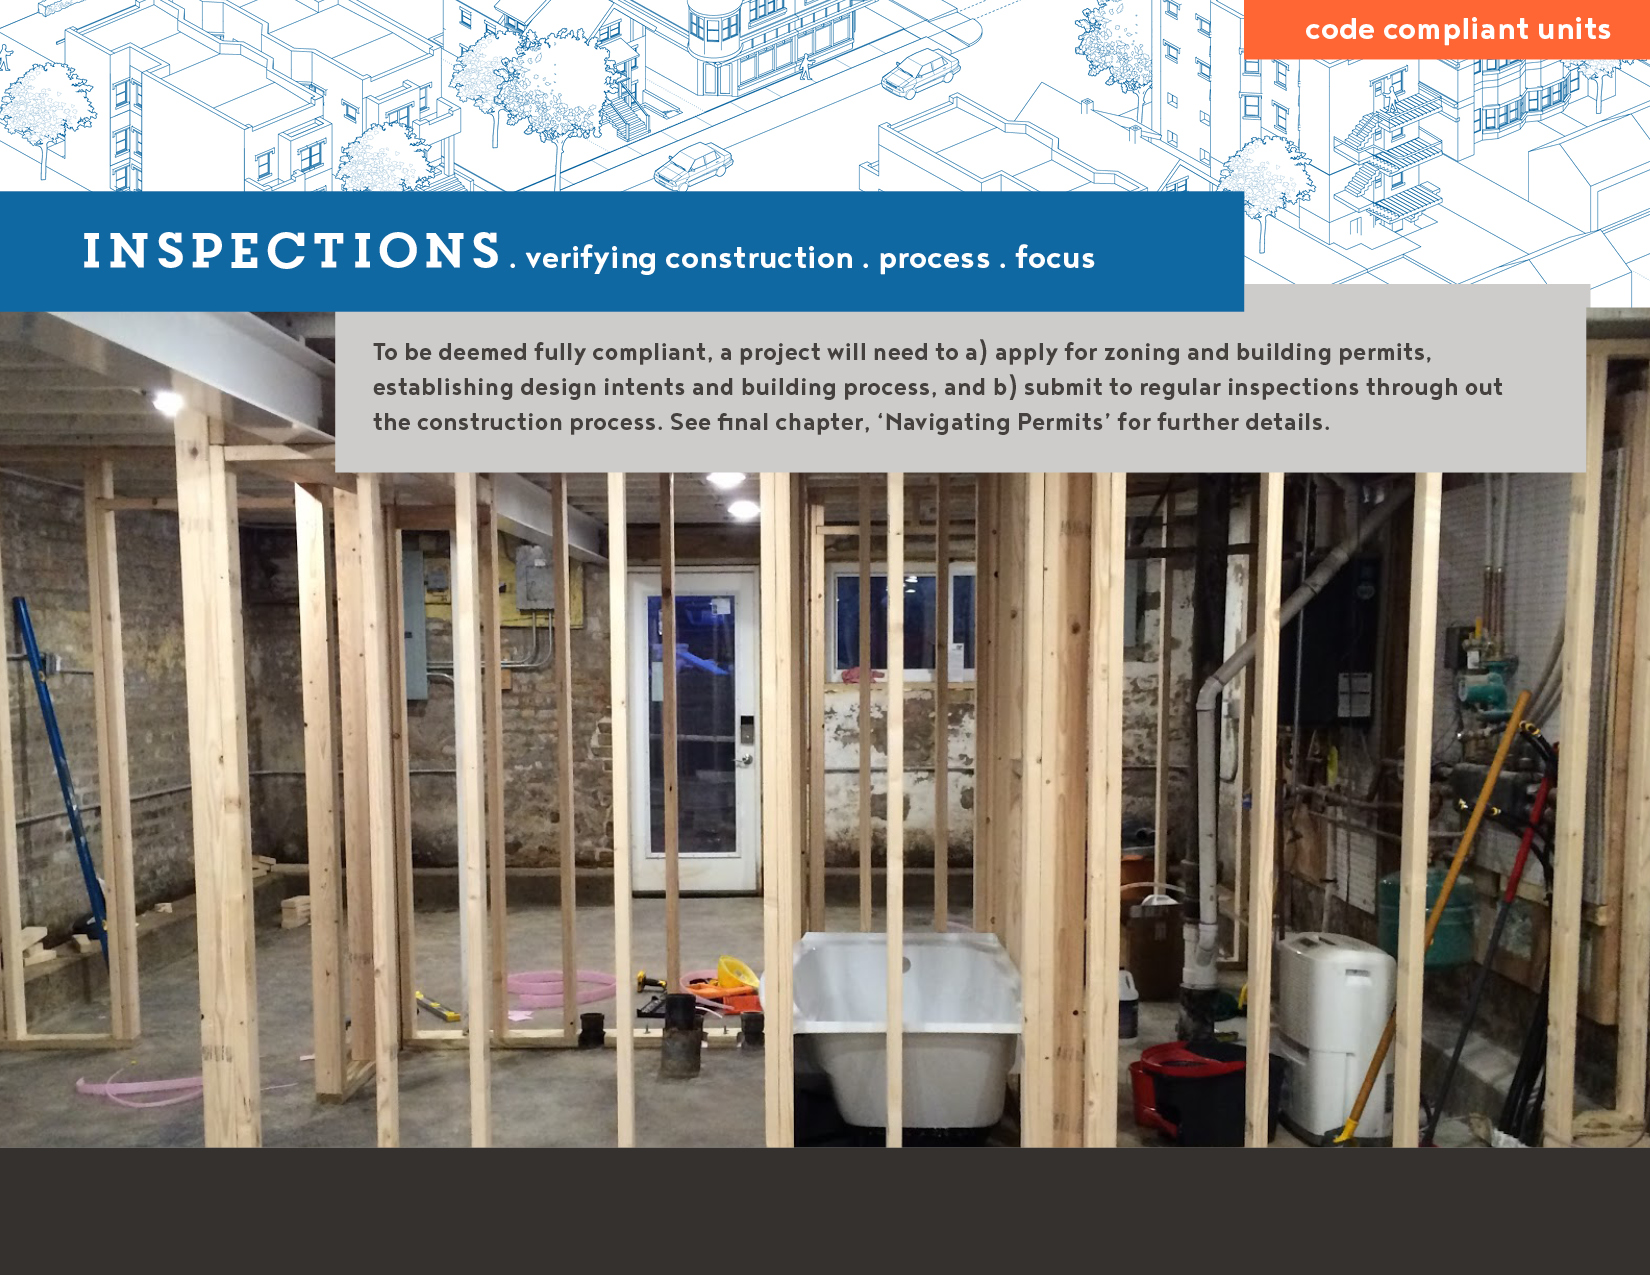
Building Inspections
The Inspection Process
As you consider a basement project, keep in mind the larger inspection process:
Inspecting a building for code compliance doesn’t happen in one swoop, but rather through a series of phased visits. Once you are granted a permit for work, you will be responsible to bring your entire building up to code. Inspectors will visit to verify that new systems have been built to code and review the condition of your existing building fabric. Multi-unit (4+ flats) owners should expect annual safety inspections as well. If you take on a basement project, it is best to think of building inspection as a serial process. For instance, if you have to pour a new basement slab and update utility connections, you can expect the following visits (and more):
- Plumbing Inspection - sewage connections, trenching beneath slab (14A-5-502.6)
- Slab and Under-floor Inspection - drainage assembly, and reinforcement for slab (14A-5-502.3.2)
- Final Inspections - finished interior space (14A-5-502.3.3)
Each inspection will take place on different dates and at varying phases of project completion. For full list and timing, see ‘Navigating Permits’.
In addition to the basement unit, all the common areas and units on your property need to be maintained up to code: stairways, entries, exterior finishes, and rental apartments. These areas’ conditions are incorporated in the compliance checklist below, under 'Maintenance' section. Building inspectors have the right to access any ‘public’ spaces, including all rental units.
For building inspectors, minor issues can be seen as indicators of potential problems that threaten tenant health and safety, and can create bigger project management issues. Beyond incurring fines, citations from the building department can trigger additional inspections or construction permit revocation. The cost of maintenance lapses can be significant; $500 fines for violations include:
- overflowing garbage (14X-3-307.1)
- excessive weeds (14X-3-302.5)
- missing address numbers (14X-3-303.3)
- ripped or missing window screens (14X-3-303.16)
- weathering/decaying paint on exterior (14X-3-303.2)
- and other violations of the existing structures’ maintenance code (14X-Chapter 3, Property Maintenance)
In addition, exterior issues that endanger tenants or passing pedestrians start with fines of $1,000, such as signs of foundation deterioration and structural fatigue, discussed under 'Structure' below. If an inspector notes exterior issues, they can file violations for ‘unsafe conditions.’ You would have 15 days to remedy the issue, after notice of violation, before needing to re-inspect the property to avoid fines. However, re-inspection costs ($100 each) can add up, given that ‘each violation and each day that a violation continues is a separate and distinct offense.’
Broadly speaking, building inspectors will be looking for maintenance and general upkeep that demonstrate an owner’s attention to building and inhabitant safety.
If you are uncomfortable with an inspection’s scrutiny of existing building conditions, you should probably reconsider a basement project. Ask yourself: would it make more sense to address existing maintenance demands (as a long term investment) than over-extend your finances in a larger alteration and conversion?

Property Assessment:
The more information you have on your building and your lot the more you will be able to anticipate conversion challenges. In addition to filling out the following templates, it would be useful to collect the following geographic and documentary information about your building:
- building age / approximate construction dates as confirmed on your property plat
- history of maintenance, renovations, and updates to building systems such as heating or plumbing
- location, in terms of: zoning districts, historic districts, transit corridors/transit-oriented development zones, Chicago’s topography, flood risk zones (FEMA) or adjacent to historic stream, rivers, or marshlands
- current utility connections, capacity, and fees
- current tax assessments and historic appeals
Keep in mind the following variables:
Building age, maintenance history, and current material condition will strongly influence whether you’re facing a minor alteration or a massive construction project. Unfortunately, most homeowners have little to no written history on their property. The best way to establish basic renovation information is to 1) look up recent tax assessments (Cook Co. Assessor), Chicago construction permits (Chicago Open Data), and Chicago Building Footprints (Chicago Open Data). The first two documents will provide a record of sales, old propery liens, and recent, permitted renovation work. The City’s building footprints can be searched by address to find initial construction dates. From here you can create a timeline of your building’s construction and renovation lifespan.
Location and elevation can strongly influence the viability and ease of creating a dry basement unit, given Chicago’s marshland history. In advance of geotechnical testing, you can determine if your building is flood prone by casual observation and finding it a) on FEMA flood maps (FEMA maps), b) within the Cook Co. Geological Atlas (ISGS atlas) and determining c) site elevation (Chicago Open Data). In addition, historic USGS quadrangles (USGS maps) and old insurance maps (Library of Congress collection) can help you determine whether your home sits atop historic marshes, stream-beds, or river banks. While different soil engineering strategies can divert water and affect drainage, sitting at a low elevation in any of these areas suggests that a project may require more intensive foundation drainage and/or waterproofing work.
Even armed with the above information, you will need to consult with technical experts. This guide is to help you ask questions and identify unknowns: can I visually confirm current conditions for estimation, or do I need a structural engineer, architect, or tradespeople? When facing particularly urgent issues for consultation and remediation (like potential structural failure or wall collapse), the text will indicate this need as follows:
This is urgent. Reach out to [specific technical expert] to assess conditions.
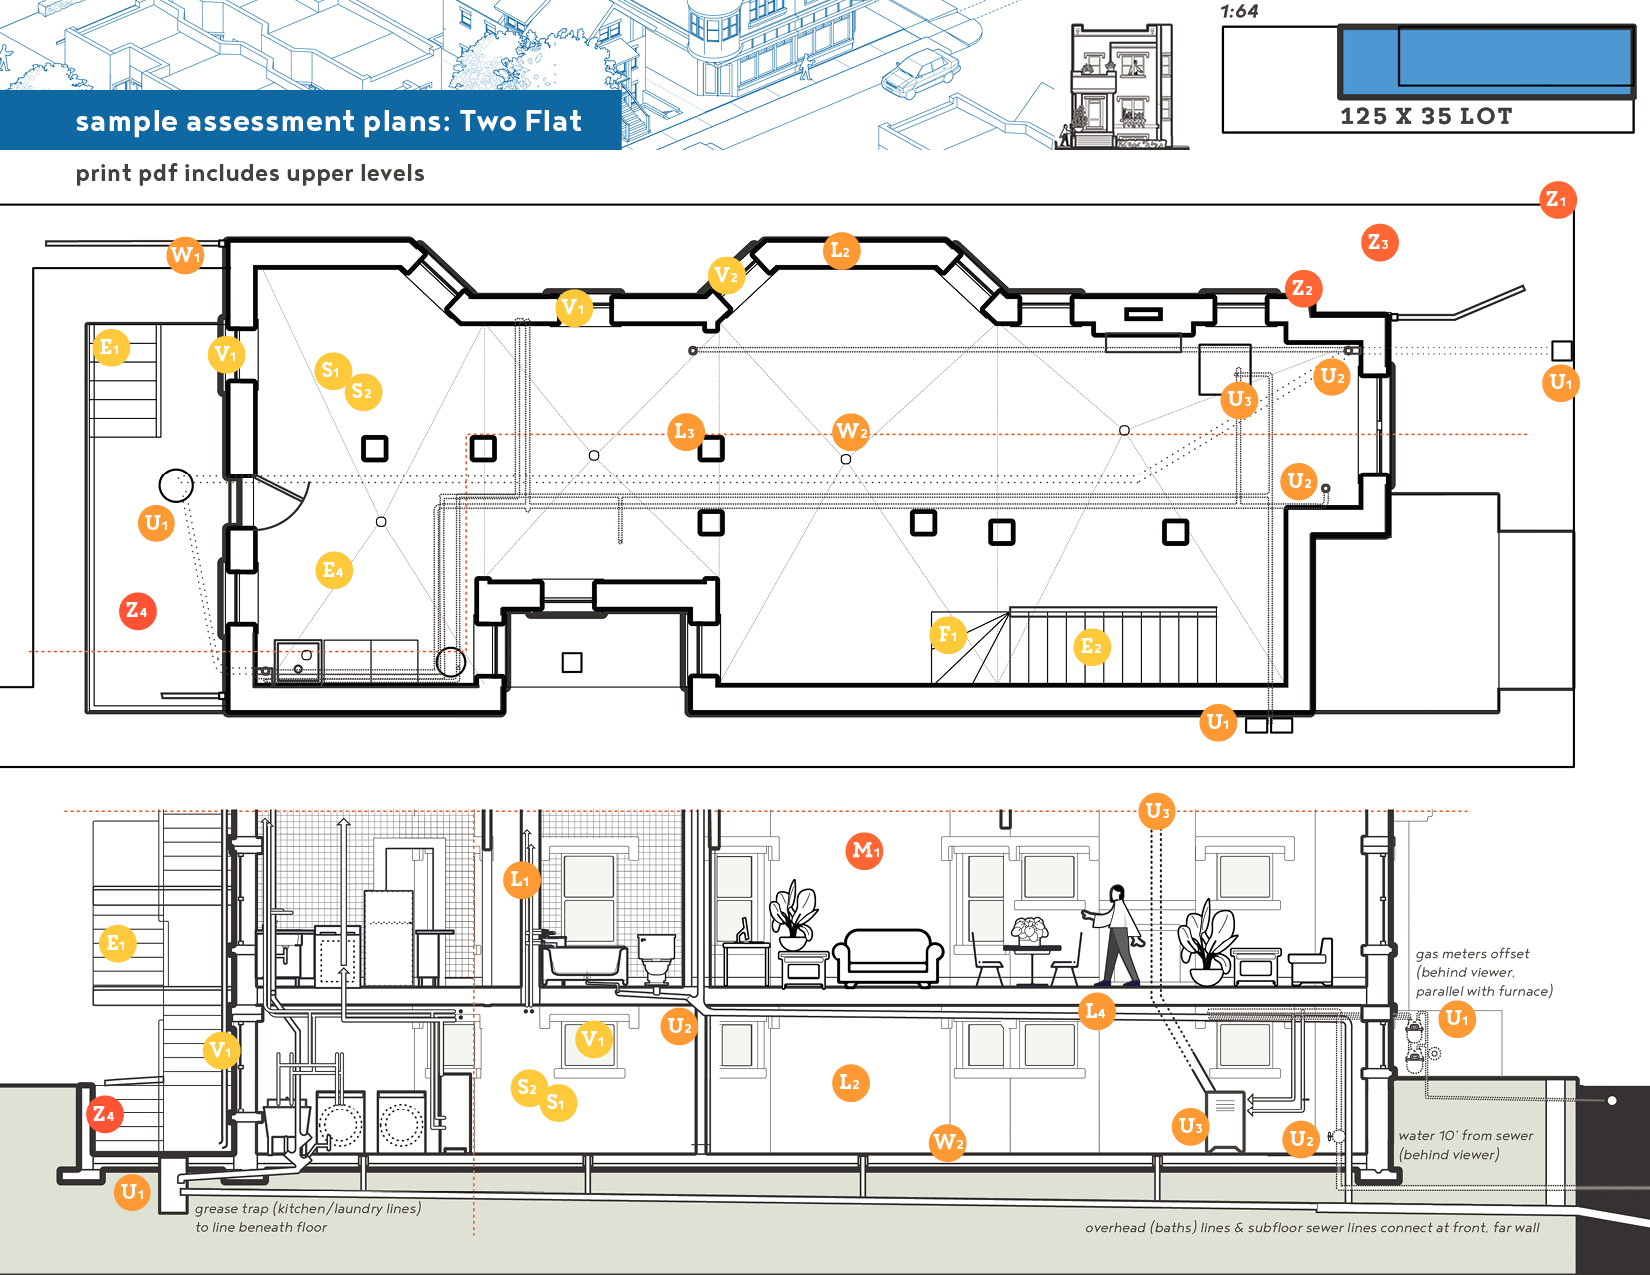
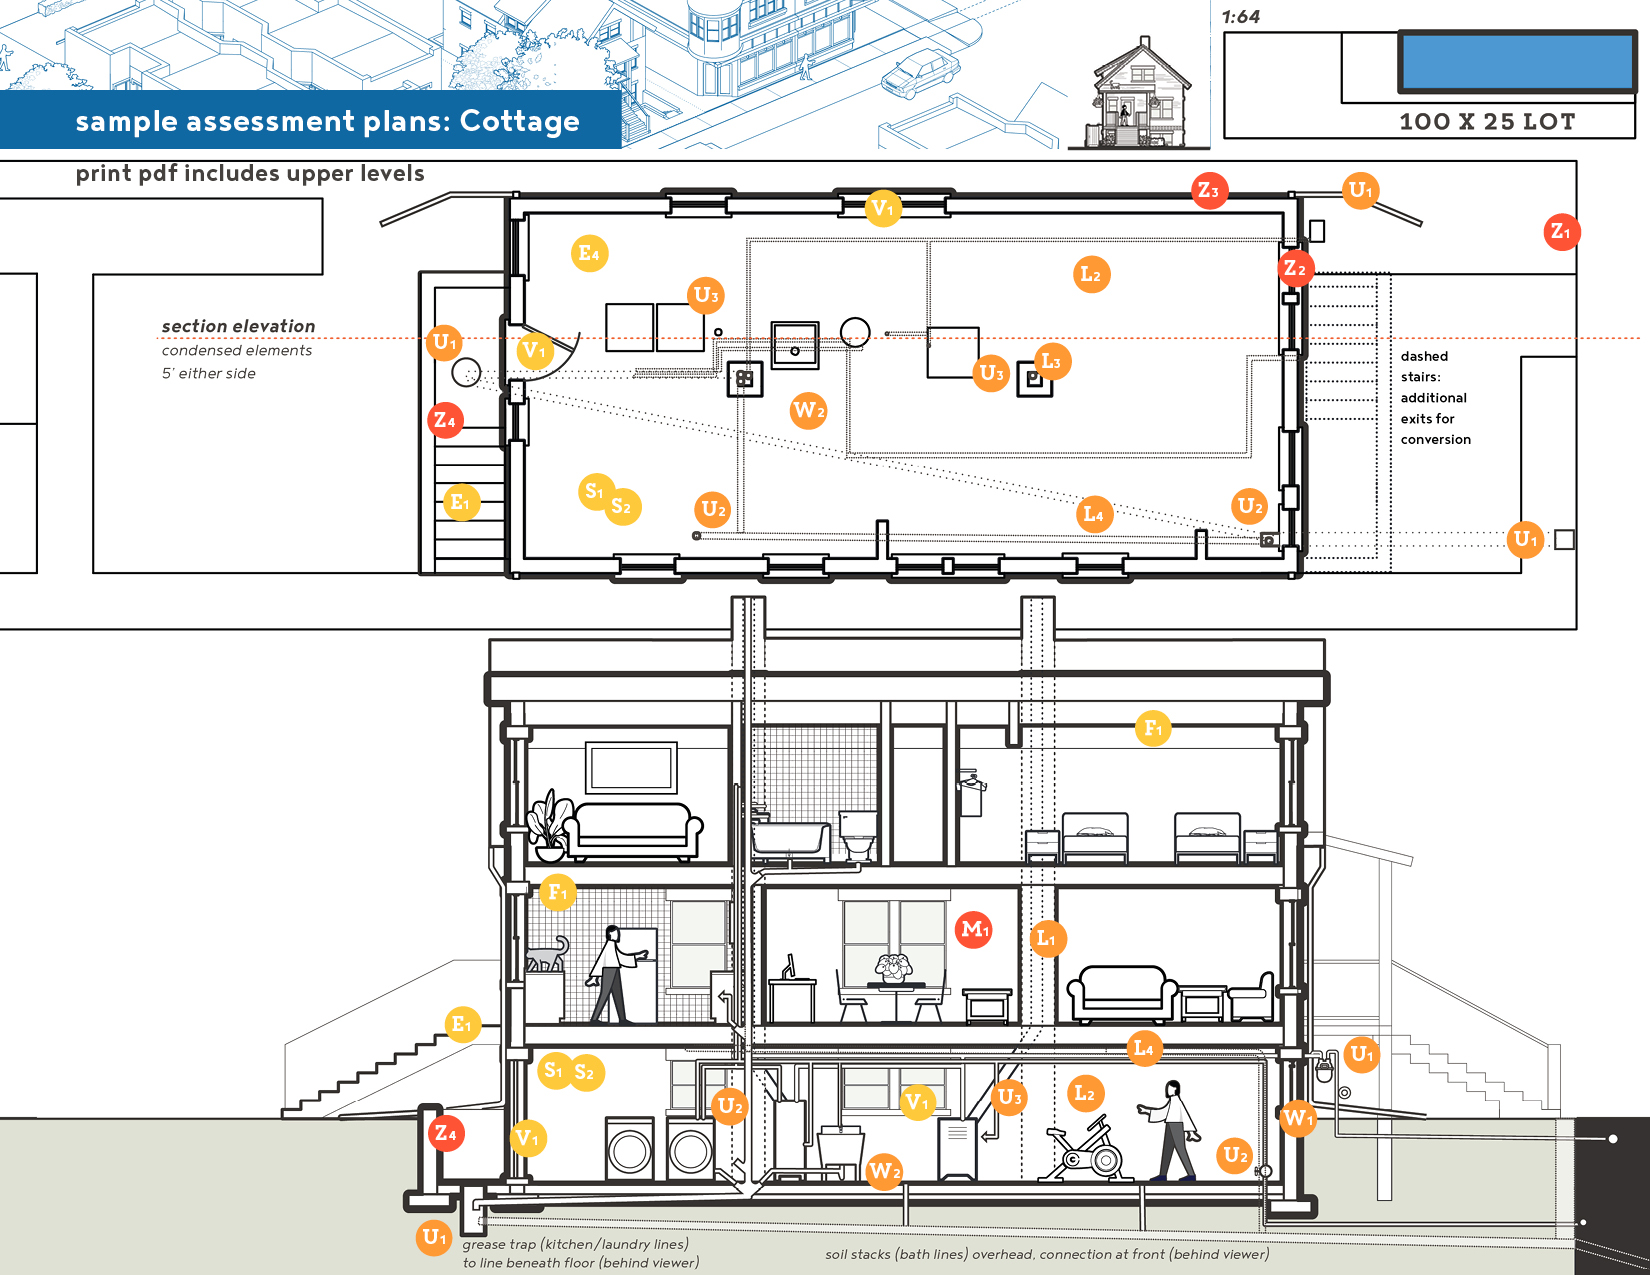
The hidden slides contain property templates—with site plans, sections, and tagged elements—to help you quickly collect relevant details and make notes on the issues, experts and information for mitigation, as you work through the Code Checklist.
Assessment Aides & Elements
site documentation
Adapt the generic site plans + building footprints on following slides to fit your building and assist in responding to the Code Compliance Checklist.
Download Printable TemplateThis template-based site assessment moves from exterior to interior, from inhabited floors to basement level (with anticipated features in the proposed unit in yellow). Generally the site and building footprints are drawn at 1/8”=1’ in plan, section, and elevation. The coding, on the list and in the drawings, links to the Compliance Checklist through abbreviated topic name and page number. This is to prompt you to establish locations for elements like basement exits or utility connections and take visual notes on your existing building. After the generic plans, a blank spread with 1/8” grids is provided for sketching additional details. The Compliance Checklist then elaborates on the specific relationships between observed site conditions and Chicago Code requirements.
Element Key, by Code Compliance section:
- Z = Zoning - load opens navigation
- M = Maintenance - load
- L = Loading (Structure & Foundations) - load
- W = Waterproofing & Slabs - load
- U = Utilities - load
- S = Size & Height - load
- V = Ventilation & Light - load
- E = Egress & Fire Exits - load
- F = Fire Detection & Containment - load
Elements to document:
Site or lot:
All the following dimensions will be noted on your plat of survey. As you will be required to submit a plat with any permit applications, order a copy for planning purposes.
-
Dimensions:
- width: typical lots range from 25 and 30 to 45 feet in residential areas, with larger sites where parcels have been combined
- depth: typical lots range from 100 and 125 to 175 feet but may vary given diagonal streets, irregular alleys
- Lot location: mid-block, corner or alley abutting location,
- Lot access: street front, alley access, existing curb-cuts or driveways, note all path dimensions and locations
General Building/
Open Area Footprints:
- Exterior building footprint - pull from city maps, plats, or hand measure
- Measurement and location of outdoor elements:
- exterior stairways or fire-escapes (note: second exit from third story of occupied space is required)
- building offsets from property lines and fences
- parking and decks, patios, porches (general open space) and areaways
- visible utility connections on exterior (gas meters) or site drainage systems
Entry floor plan & common spaces
- Stair measurements
- stairway width and landings width, depth
- railing locations, conditions, height
- individual steps: vertical rise, horizontal run, total count of steps per floor
- Hallway measurements
- common hallway width, height, and clearance minus any doors (when fully opened against the wall)
- placement and condition of units’ entry doors along hallways
- Approximate wall placement
- locations, wall thicknesses for considering additional columns or joist repairs in basement
- identify wall materials if possible
- Any existing signs of structural deterioration, surface decay
- uneven trim with gaps at baseboards,
- non-plumb walls and plaster cracks
- discoloration from moisture, mold
- warped boards around areas of thermal expansion, etc.
- Existing smoke detectors (sprinklers if applicable)
Basement level -
overall conditions
- Interior dimensions of existing space: width, length, clear height and variations in ceiling height with ductwork, radiators, etc.
- Foundation walls:
- thickness, estimate with measurements at windows
- material(s), location of change to materials in upper floors
- height from floor to ground level
- exterior water or dampproofing - visible just above ground level - & roof drainage
- Additional bearing columns, size, and footing size
- supported girders, size and span
- Ceiling assembly, if visible:
- joist sizes, spans, spacing and signs of deflection
- existing lath/plaster or wallboard coverings
- Condition of existing floor/slab - cracks, joints, settling, slopes, existing floor drains, radon exhaust lines
- Door and window locations, size, and operability
- any connected light wells, their dimensions
- Utility connections and areas
- quick diameter measurements per water, sewage line (+ total fixture counts/line) for estimating capacity
- any exhaust/venting systems and their location - for heating, sewage, radon, etc.
- appliances like heaters, water heaters, electrical breakers, etc. as well as existing pumps or subsoil drainage access
Proposed Conditions (hypothetical)
- General interior dimensions/layout and wall locations
- Zones to be left in common: utility rooms, access to utilities, shared exit and entry paths, other units’ storage
- Any new door/window openings
- Anticipated utility or drainage connections for kitchens, baths

Code Elements Checklist:
Introduction & Details
The Code Compliance Checklist below walks through common regulations, technical experts to consult, and the codes themselves (with chapter numbers as links). The diagrams and visual examples are based on the Two-Flat and Cottage conversions introduced in the prior chapter, with common lot sizes and Chicago construction details.
Code Compliance sections:
 Residential Zoning
Chicago uses zoning to direct allowable uses and building density. To determine whether you can add a basement unit, find your zoning district at The Chicago Zoning Map and see whether you are in a pilot zone.
Summary: Under current zoning, single family residences in zones RS-3 and higher can add a second unit. Two-Flats in zones RT-3.5 and higher can add a third unit. Within Pilot Zones, owner-occupants can add a unit to homes over 20 years old, with additional constraints.
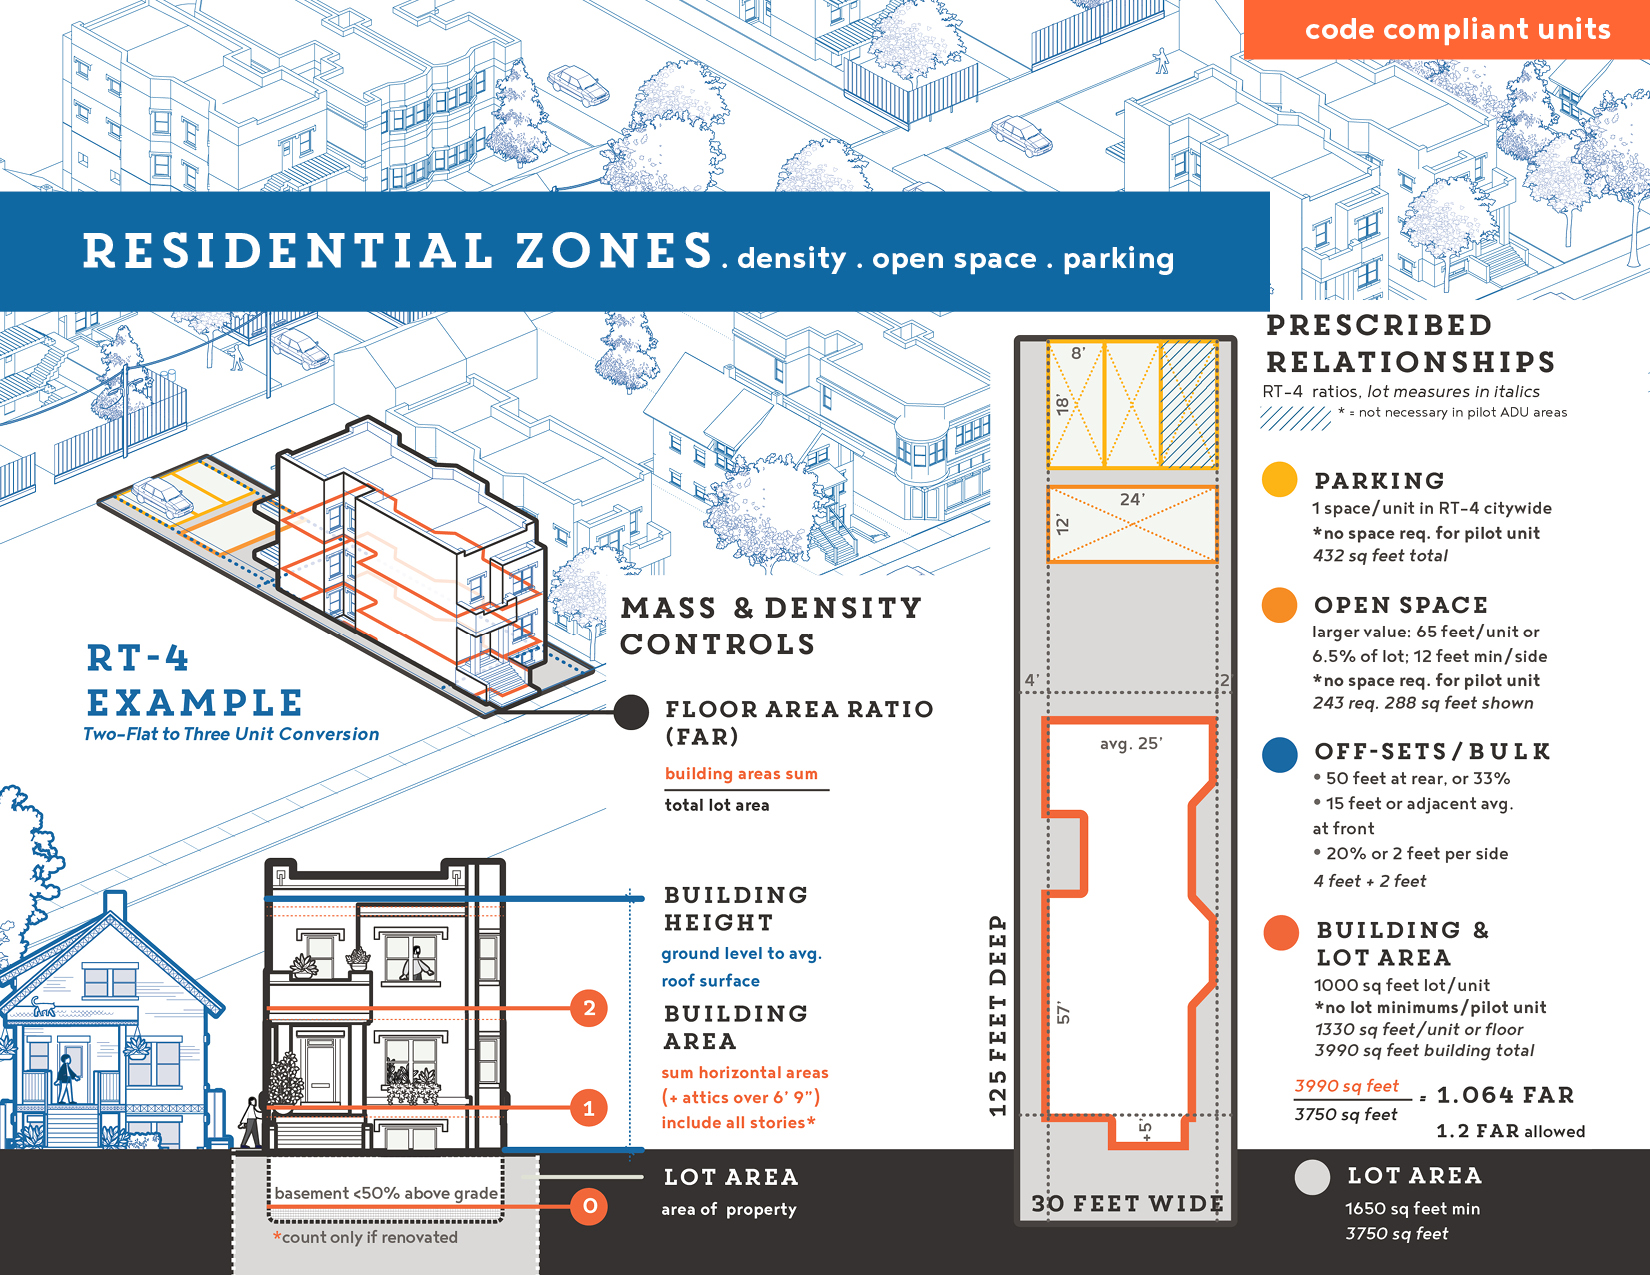
See zoning details for parking, open space, density, and other building constraints.
Show/Hide Zoning Details
Residential Zoning
The principles of zoning:
Chicago’s initial zoning ordinance was established in 1923 and significantly revised in 1957, aiming to separate incompatible uses and direct neighborhood development. At the scale of your property, zoning regulates a) use: how many units you can have within your building, b) density: how much lot area, parking and open space (lawn, patio) each unit should have, and c) bulk: how far from the lot lines (i.e. offsets) you can build new elements. You’ll need to determine your zoning district (directions below) to make sure you’re able to add another unit to your building. If a unit exceeds allowed use, density, or bulk standards, you can apply to the Department of Planning and Development for an administrative adjustment (see ‘Navigating Permits’).
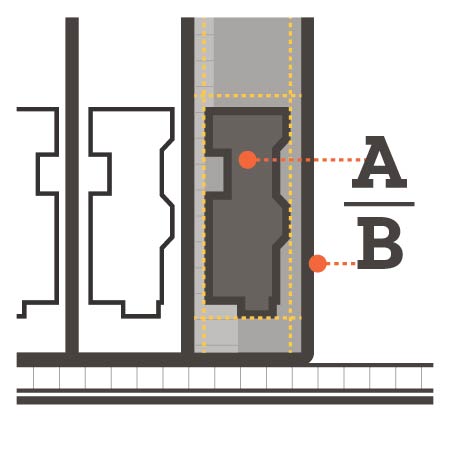
A zoning district is an area geographically demarcated by the City and coded for allowable uses. To find your district, go to The Chicago Zoning Map and search by your address. Once you have the district code, you can confirm the uses intended by the City (see tables below). To calculate the density of units allowed on your lot - the Floor Area Ratio - you’ll need to know the sum of inhabited areas in your building (right, Building Area) and divide it by area of your lot.
Your zoning designation is defined by a combination of letters (Use Group) and numbers (Use Type). The example at left is in an ‘RT-4’ district. Use Group R covers all residential uses; your building is most likely in an RS (detached housing) or RT (Two-Flat, Townhouse and Multi-Unit) district. Use Type ascends from 1 to 6.5 and signifies allowable density. RS-3 , RT-3.5, and RT 4 allow for two or more flats per property. The zoning tables (next page) then specify additional characteristics. For an RT-4 property, this includes a maximum Floor Area Ratio of 1.2 and minimum lot area of 1650 sq feet, with 1000 sq feet of lot per unit, with additional open space, offsets, and parking requirements, as diagrammed in Prescribed Relationships.
Effective May 1, 2021, in pilot areas’ zoned RS-2 +, the Additional Dwelling Unit ordinance allows for a residential property to add a ‘conversion’ basement unit by right. This applies to buildings over 20 years in age but cannot be built on a property with a carriage house. See pilot details.
documents & resources:
- Zoning for your Lot: The Chicago Zoning Map
- Zoning Ordinance (17-2, 17-10) + Additional Dwelling Units substitute Ordinance (Amendment) (summarized in drawings)
- General dimensions of your lot & building floors as a) lot areas: overall, parking spaces, and open areas, b) distances from your building to lot edges, alleys, and public sidewalks; and c) the gross area of each occupied floor + anticipated basement unit.
Zoning - Citywide
Is your unit allowed under chicago’s zoning?
Hypothetical answers, in blue outlines, are based on RT-4 classification and the Two-Flat + basement conversion on last page. Colors key to example; low saturation = lower density areas (less likely to allow additional units).
Use your site measurements and district classification to see if you can add another unit.
Under current zoning, single family homeowners in areas RS-3 or higher can add a unit to become a two-flat building. Given the small size of many RS-3 Chicago lots, the owners will likely need to get an administrative adjustment from the Department of Building and Planning, to accomodate variances in density, parking, and open space requirements (see 'Navigating Permits').
Likewise by ‘use’, Two-Flat owners in areas RT-3.5 and higher can add an extra unit to become a multi-unit building of 3+ flats. Again, Chicago’s small lot sizes mean you may also need an administrative adjustment for bulk and density issues (see 'Navigating Permits').
The tables on this page apply citywide, outside the ADU pilot areas.
Zoning Code:
note: Hyperlinks connect to code chapter and sub-section (in a new tab). You may to scroll down to reach specific tables or lines, as noted by numbers.
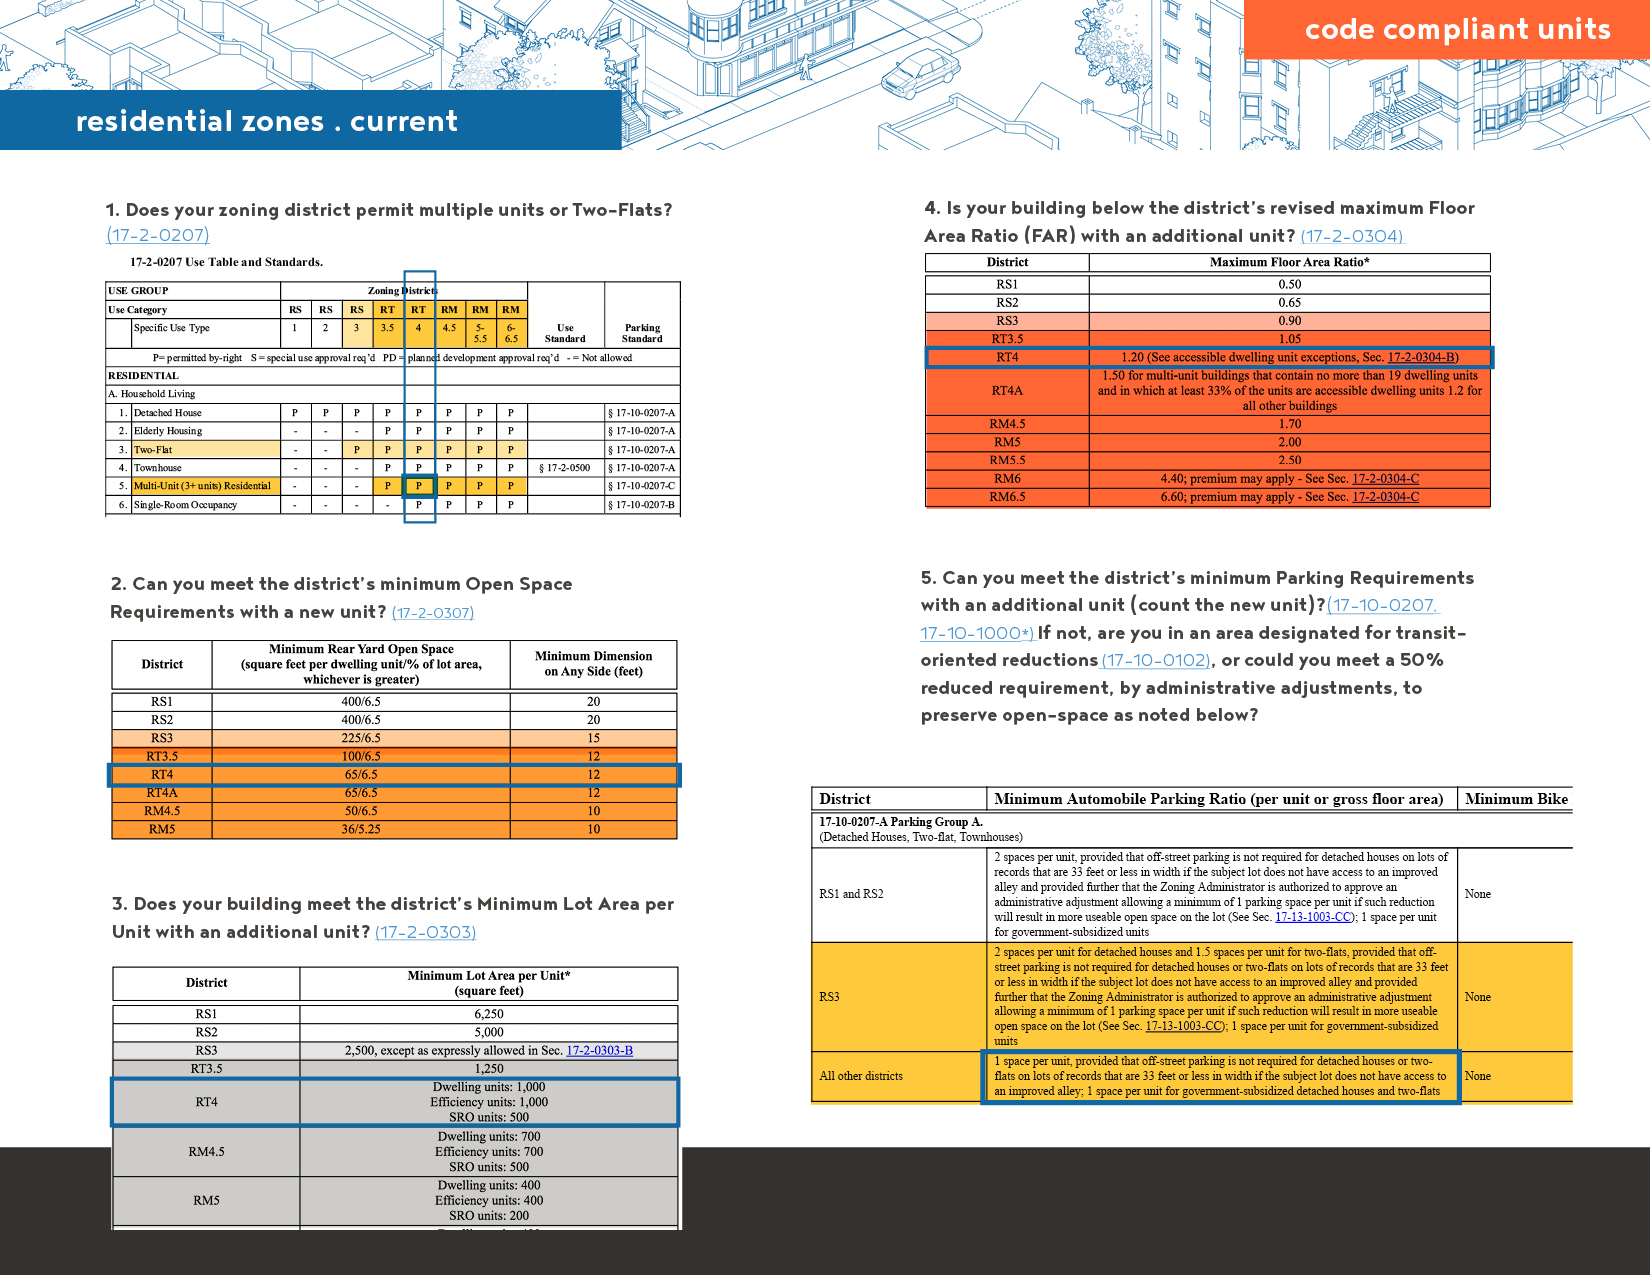
1. Does your zoning district permit multiple units or Two-Flats?
(17-2-0207)
2. Can you meet the district’s minimum Open Space Requirements with a new unit? (17-2-0307)
3. Does your building meet the district’s Minimum Lot Area per Unit with an additional unit? (17-2-0303)
4. Is your building below the district’s revised maximum Floor Area Ratio (FAR) with an additional unit? (17-2-0304)
5. Can you meet the district’s minimum Parking Requirements with an additional unit (count the new unit)?(17-10-0207, 17-10-1000*) If not, are you in an area designated for transit-oriented reductions (17-10-0102), or could you meet a 50% reduced requirement, by administrative adjustments, to preserve open-space as noted below?
Other Considerations:
- Site Setbacks: While older buildings maybe non-compliant for set-backs (and authorized as such), it is important to consider how much your lot must accomodate for construction and new elements for a basement unit.(17-2-0305) See foundations and site drainage, window wells, and egress for elements with potential set-back conflicts.
- Non-Residential Zones: This checklist only addresses residential use in residential districts. It does not cover live/work units or flats in Business or Commercial zones.
Zoning - ADU Pilot Areas
Is your new basement unit allowed under chicago’s ACU pilot program?
Hypothetical answers, in blue outlines, are based on RT-4.Use your district classification and location to see if you can add another unit. In pilot areas, conversion units can be added by right. Allowable number of units and loosened restrictions are listed below.
pilot area allowances
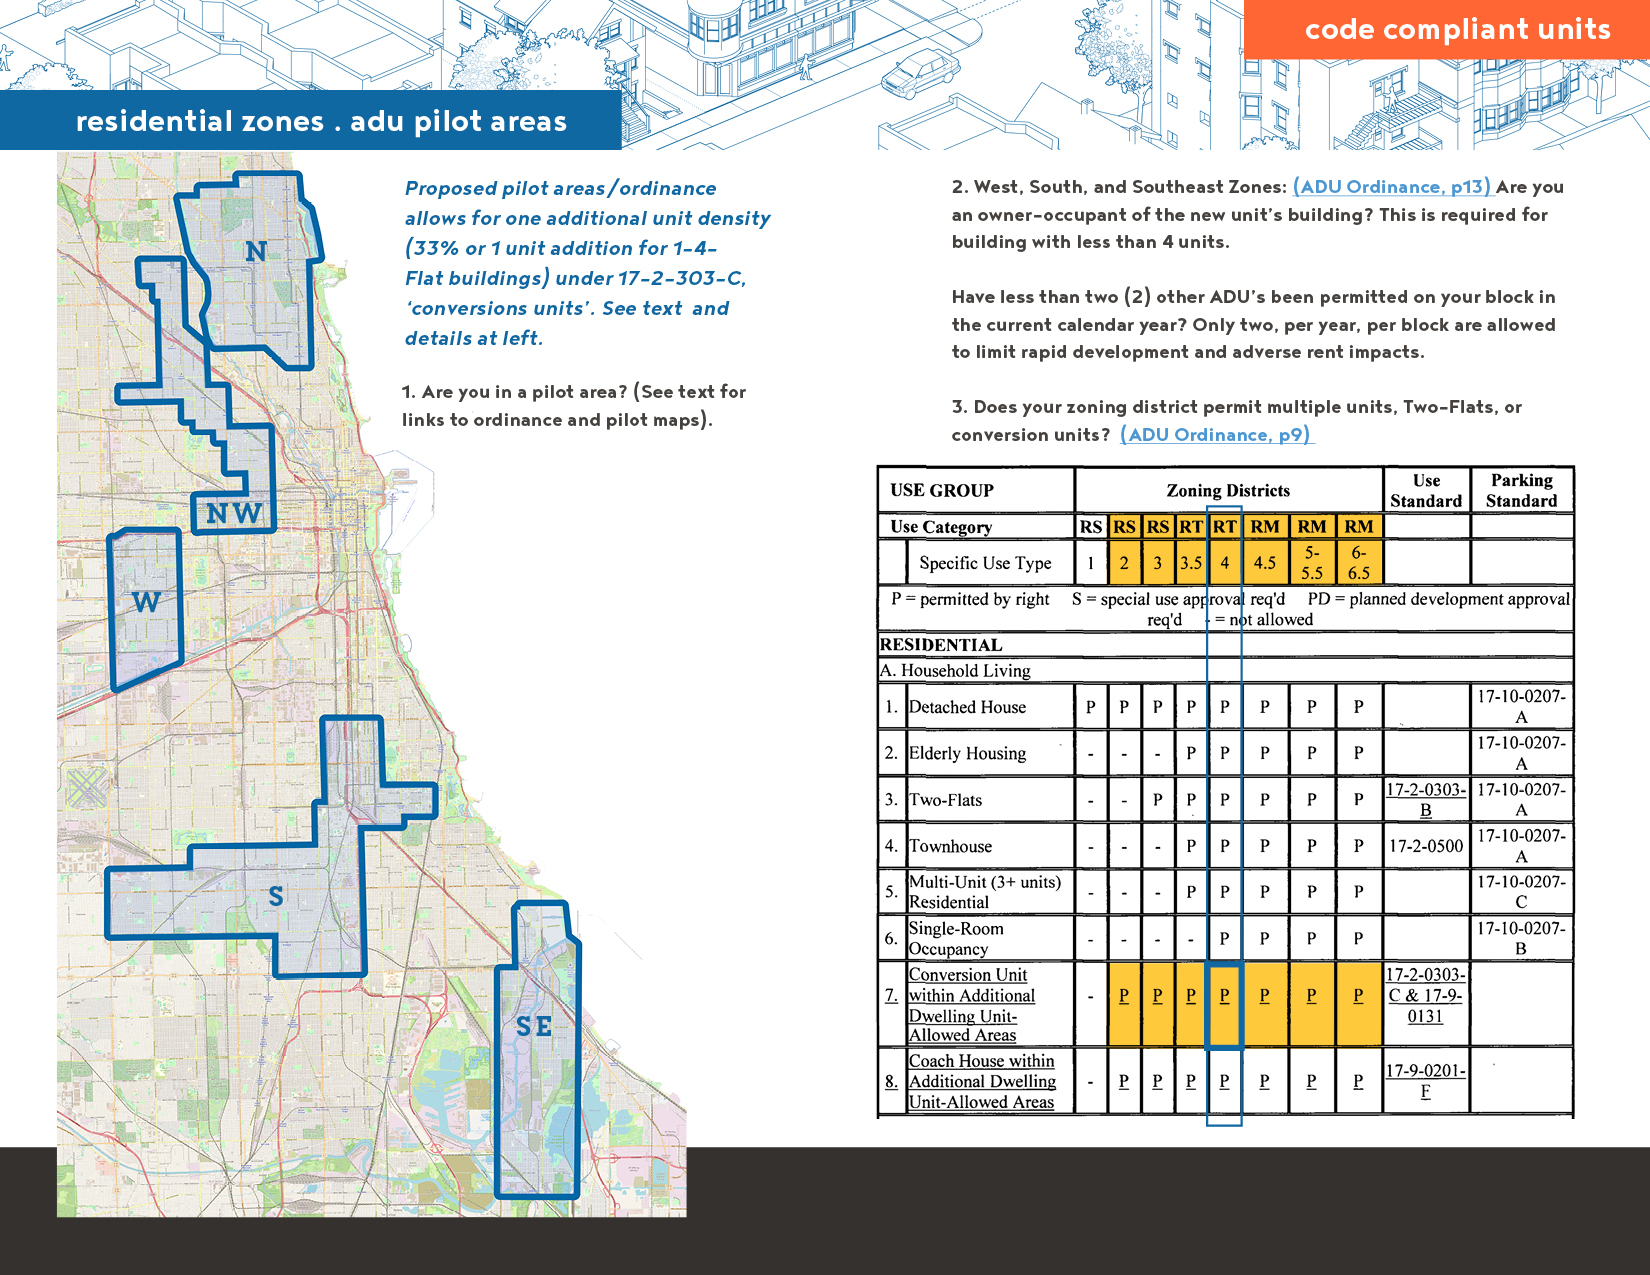
1. Are you in a pilot area? (Grey diagonal lines = ADU area on Chicago Zoning Map) Additional tools available on ADU microsite.
- North Zone is bounded by Devon, the lakefront, Lawrence, Clarendon, Halsted, Diversey, Lincoln, Belmont, the North Branch of the Chicago River, the North Shore Channel, Peterson, Califomia, Granville, and Seeley.
- Northwest Zone is bounded by the Eisenhower Expressway, Sacramento, Fulton, Damen, Chicago, Western, Hirsch, Rockwell, North, Sacramento, Bloomingdale, Kedzie, Palmer, Kostner, Fullerton, Central Park, Belle Plaine, Lawndale, Montrose, Harding, Lawrence, Kedzie, Elston, California, Fullerton, Western, North, and Ashland.
- West Zone is bounded by the Eisenhower Expressway, Homan, the South Branch of the Chicago River, and 4600 West.
- South Zone is bounded by Cicero, 7500 South Kedzie, 71st St., Halsted. 63rd St., 600 West, 47th St., King, 60th St., Dorchester, 65th St., Cottage Grove, 67th St., the Dan Ryan Expressway, 95th St., Ashland, and 87th St.
- Southeast Zone is bounded by 8300 South, the city limits, Torrence, 95th St., Commercial, 83rd PI., and Houston.
2. West, South, and Southeast Zones: (see ADU Ordinance, p13)
-
Are you an owner-occupant of the new unit’s building? This is required for building with less than four units.
- Have less than two (2) other ADU’s been permitted on your block in the current calendar year? Only two, per year, per block are allowed to limit rapid development and adverse rent impacts.
3. Does your zoning district permit multiple units, Two-Flats, or conversion units? (ADU Ordinance, p9)
ADU Ordinance definitions
17-2-0303-C Conversion Unit:
Within Additional Dwelling Unit-Allowed Areas, in the case of building permit applications for the repair, remodeling, or alteration of residential buildings that are located in any RS2. RS3, RT or RM zoning district and that have been in lawful existence for 20 or more years, the density of such residential buildings may be increased in accordance with Section 17-9-0131 by 33% of the number of lawfully established dwellings units, other than conversion units, that have been in existence in the residential building for 20 or more years; provided, however, that if such residential building contains a single dwelling unit, the density of such residential buildings may be increased by one dwelling unit.
If this 33% calculation results in a fractional number, any fractional result of 0.5 or more must be rounded up to the next consecutive whole number.
units are not subject to:
- a) minimum lot area restrictions (#3, citywide zoning),
- b) open space requirements (#2, citywide zoning),
- c) accessory parking requirements (#5, citywide zoning), but
- d) cannot be on the same lot as a carriage house or used for short-term rentals (airbnb, etc.).
additions allowed (rs-2 +):
- Single Family + 1 unit = 2 units total
- Two-Flat + 1 unit = 3 units total
- Three-Flat + 1 unit = 4 units total
- Four-Flat + 1 unit = 5 units total
- Five-Flat + 2 units (1 affordable) = 7 units total
- Six-Flat + 2 units (1 affordable) = 8 units total
 Maintenance
Any alteration of a structure that builds out a new unit must comply with the code for new construction. In addition, any existing structures and site areas that are visible to inspectors must meet the ‘Minimum Requirements for Existing Structures.’
Summary: In essence your entire building (and site) must be structurally sound, in good repair, and safe for occupants and neighbors.
See maintenance details for element conditions that indicate need for repair & expert consultation.
Show/Hide Maintenance Details
Maintenance
existing conditions and building maintenance:
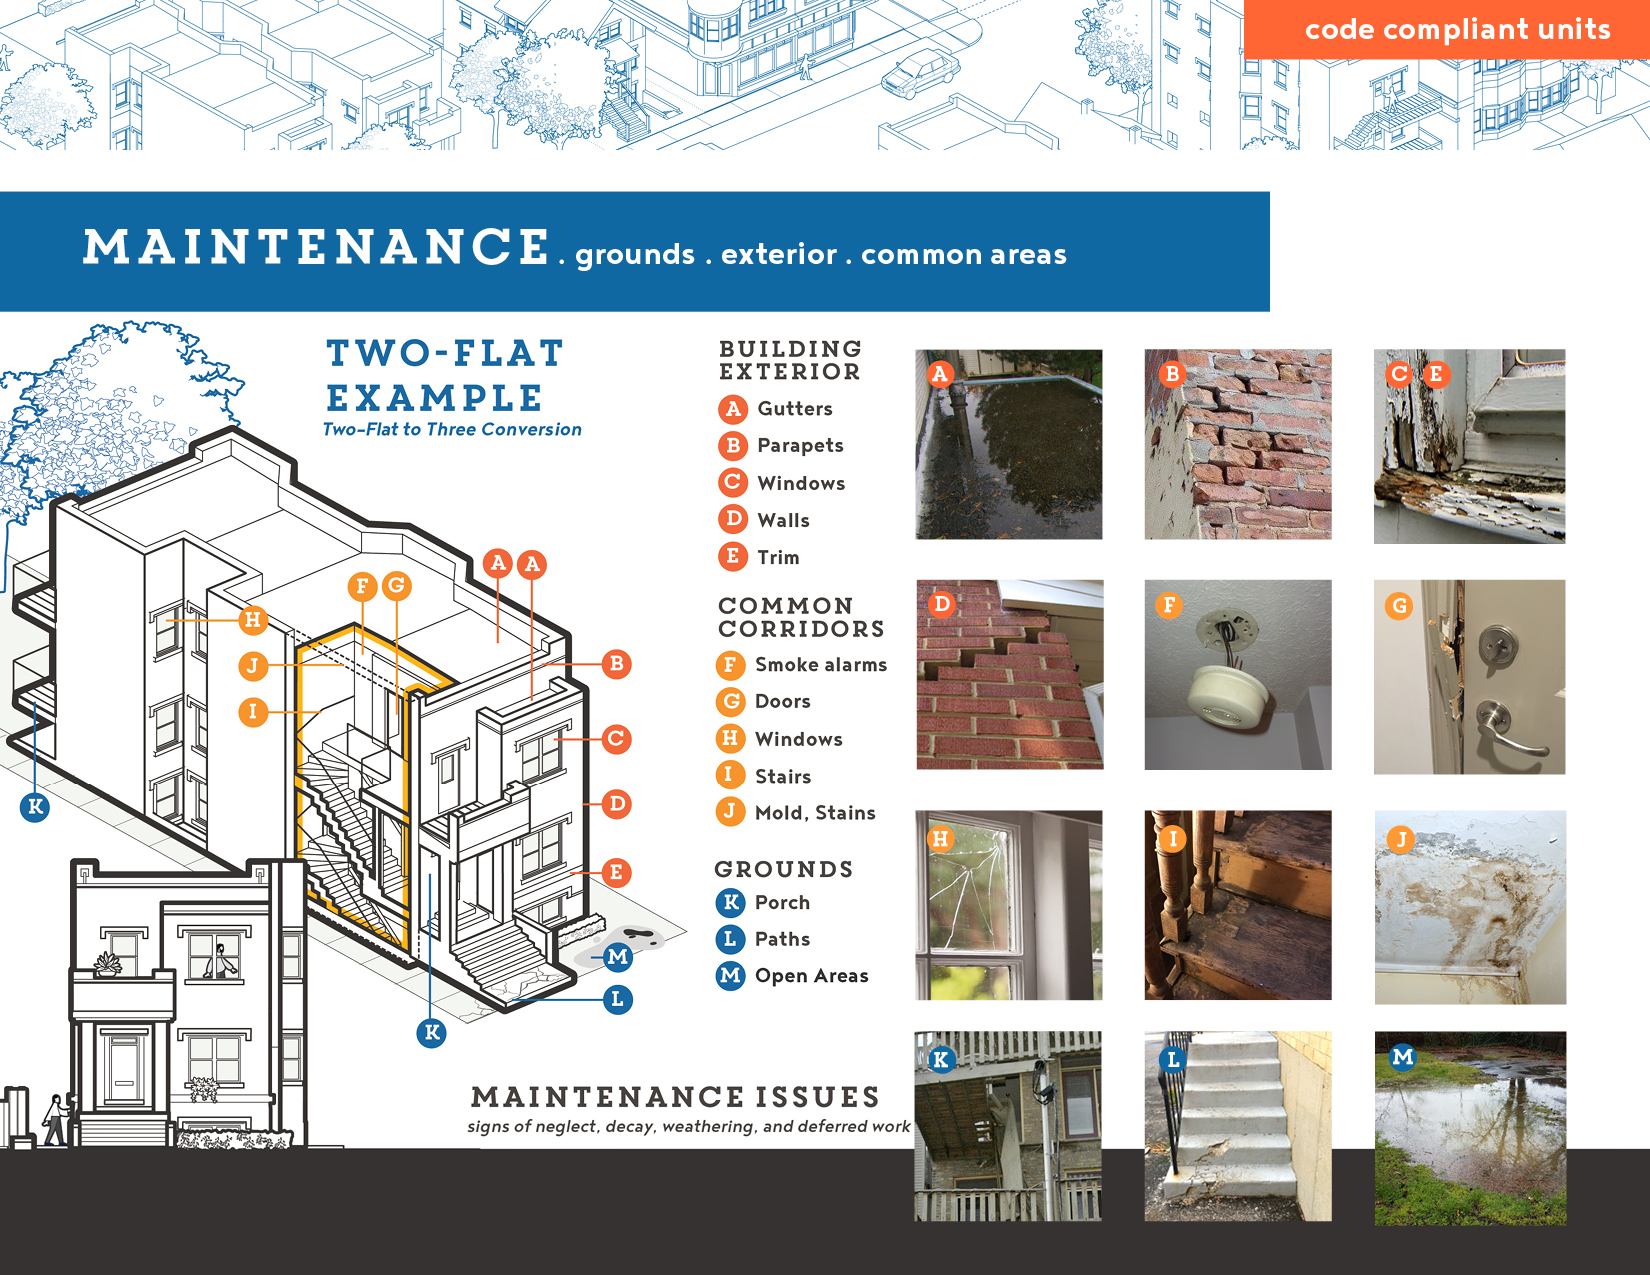
You should be aware that any alteration of a structure that builds out a new unit must comply with the code for new construction. In addition, any existing structures that are visible to inspectors must meet the ‘Minimum Requirements for Existing Structures.’ That means that all the elements marked (right, Maintenance Issues) are required by code to be ‘structurally sound and in good repair’.
As shown in the photographs, structural deficiencies can manifest as cracks (loading fatigue), the pulling apart of surfaces (inadequate anchoring), and deteriorating siding, masonry, roofs, and stairs. Even decaying paint and trim, which seems minor, can be an indicator of problems like termite infestations and structural decay (see next page).
All of these conditions would qualify as potentially unsafe. If you see similar deterioration on your building, you should hire an architect to evaluate the structure’s soundness.
Whether or not you decide to add a basement unit, your building should be maintained in safe and sound condition. Tenants, neighbors, or strangers can report visible issues to the Department of Buildings, triggering a code violation and required building inspection.
documents & resources:
- The Chicago Construction Code - Minimum Requirements for Existing Structures (14-X) (summarized in drawings)
- Visual observation - walk around your site and any common spaces - hallways, stairs, the units exterior doors - document issues to repair and/or discuss with consulting architect
- Architect to create an ‘existing conditions’ report if ‘unsafe conditions’ are found by inspectors.
Does your Building have unsafe conditions:
potential structural problems in parenthesis ( )
Homeowners can visually inspect their buildings prior to beginning any construction project, looking for the following:
Do you have visibly unsafe exterior conditions? (14X-3-303)
- A Clogged gutters or downspouts (roof/wall saturation and accelerated decay)
- B Decaying mortar or bricks on parapets or chimneys (wall collapse and falling materials)
- C Non-weather resistant siding and masonry joints with windows or doors (wall saturation and accelerated decay)
- D Exterior walls and foundations that are not anchored, plumb, or free of holes and cracks, windows or frames are not square or operable, floors slope (material failures facing building weight)
- E Unpainted or peeling decorative trim (rot and infestation)
Are units and common spaces adequately secure, with safe exits? (14X-4-304)
- F I Common stairwells lack smoke alarms, have missing treads, handrails, and irregular risers, are < 36” wide (see Egress)
- G Building Entrances lack locks or Unit Doors are missing locks, view holes (basic violation of tenant’s rights)
- H Inoperable windows or windows lacking screens and panes. (violation of tenant’s safety rights; see Ventilation and Light)
- J Water-stained walls and signs of mold (saturation and decay)
Do you have unsafe conditions on your grounds? (14X-3-302)
- K Decking, pathways, or exterior stairs show fatigue and decay (material stress and structural failure)
- L Open areas have standing water (water management failures, see Slab and Waterproofing)
- M Unruly vegetation/untidy garbage areas (infestations potential)
 Structure &
 Foundations
Building assemblies work together to transfer loads - like the weight of materials, furniture, and occupants - down to the foundation and, beneath it, the ground. Standing in your basement, you should examine the exposed overhead joists (ceiling), foundation walls and any columns or interior walls for signs of structural damage that needs repair.
Summary: Structural defects and decay are common in older homes. If you see the issues, discussed in the details, you must consult a structural engineer or architect to assess potential structural failures.
See structural details for common indicators of excess loading and material decay.
Show/Hide Structure & Foundations Details
Existing Structure (Overhead)
general principles for loading and foundations:
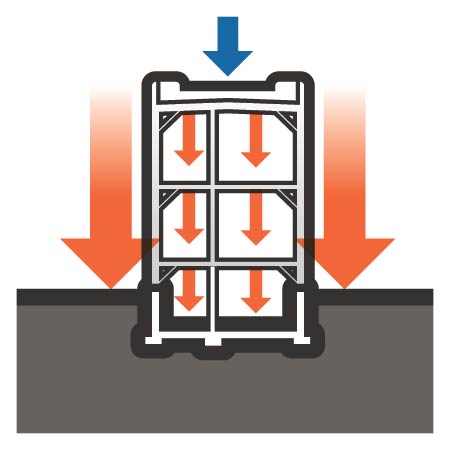
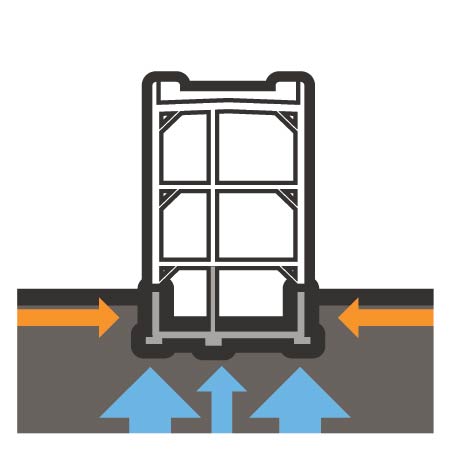
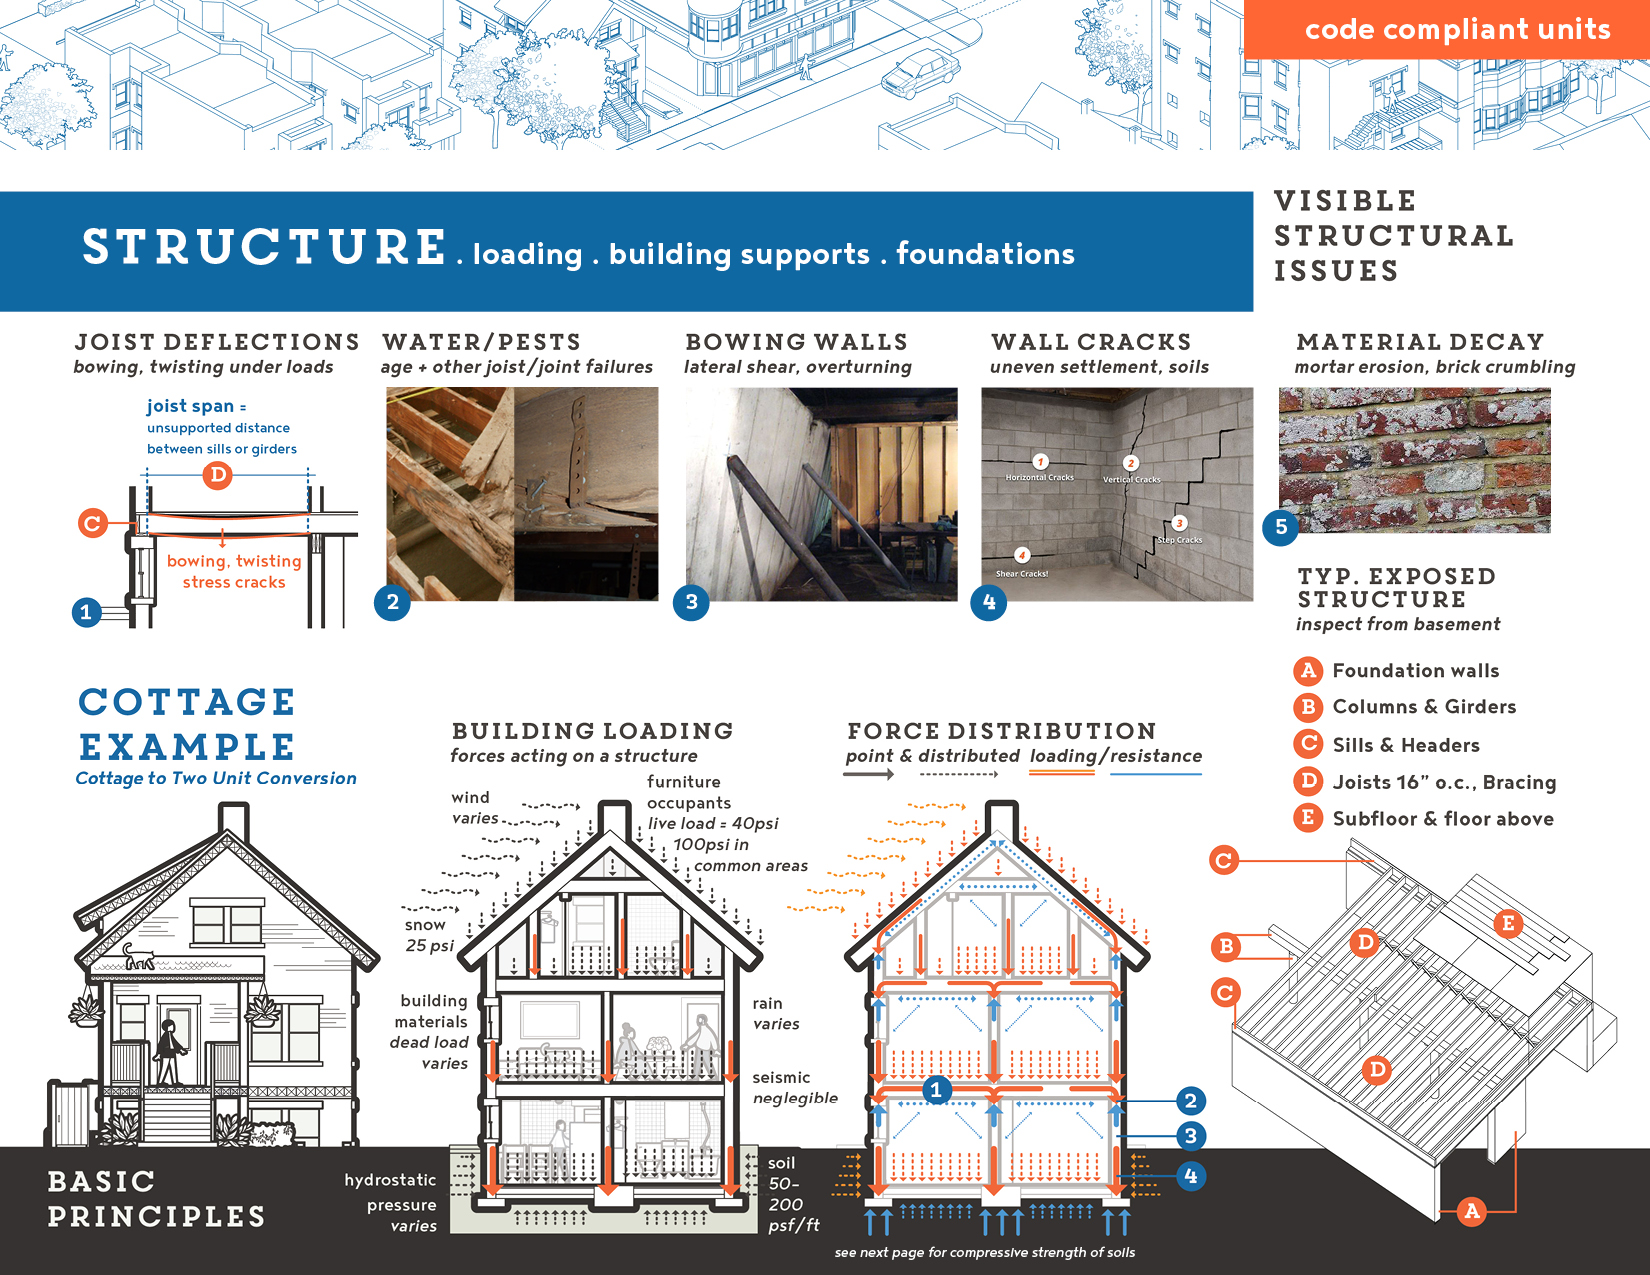
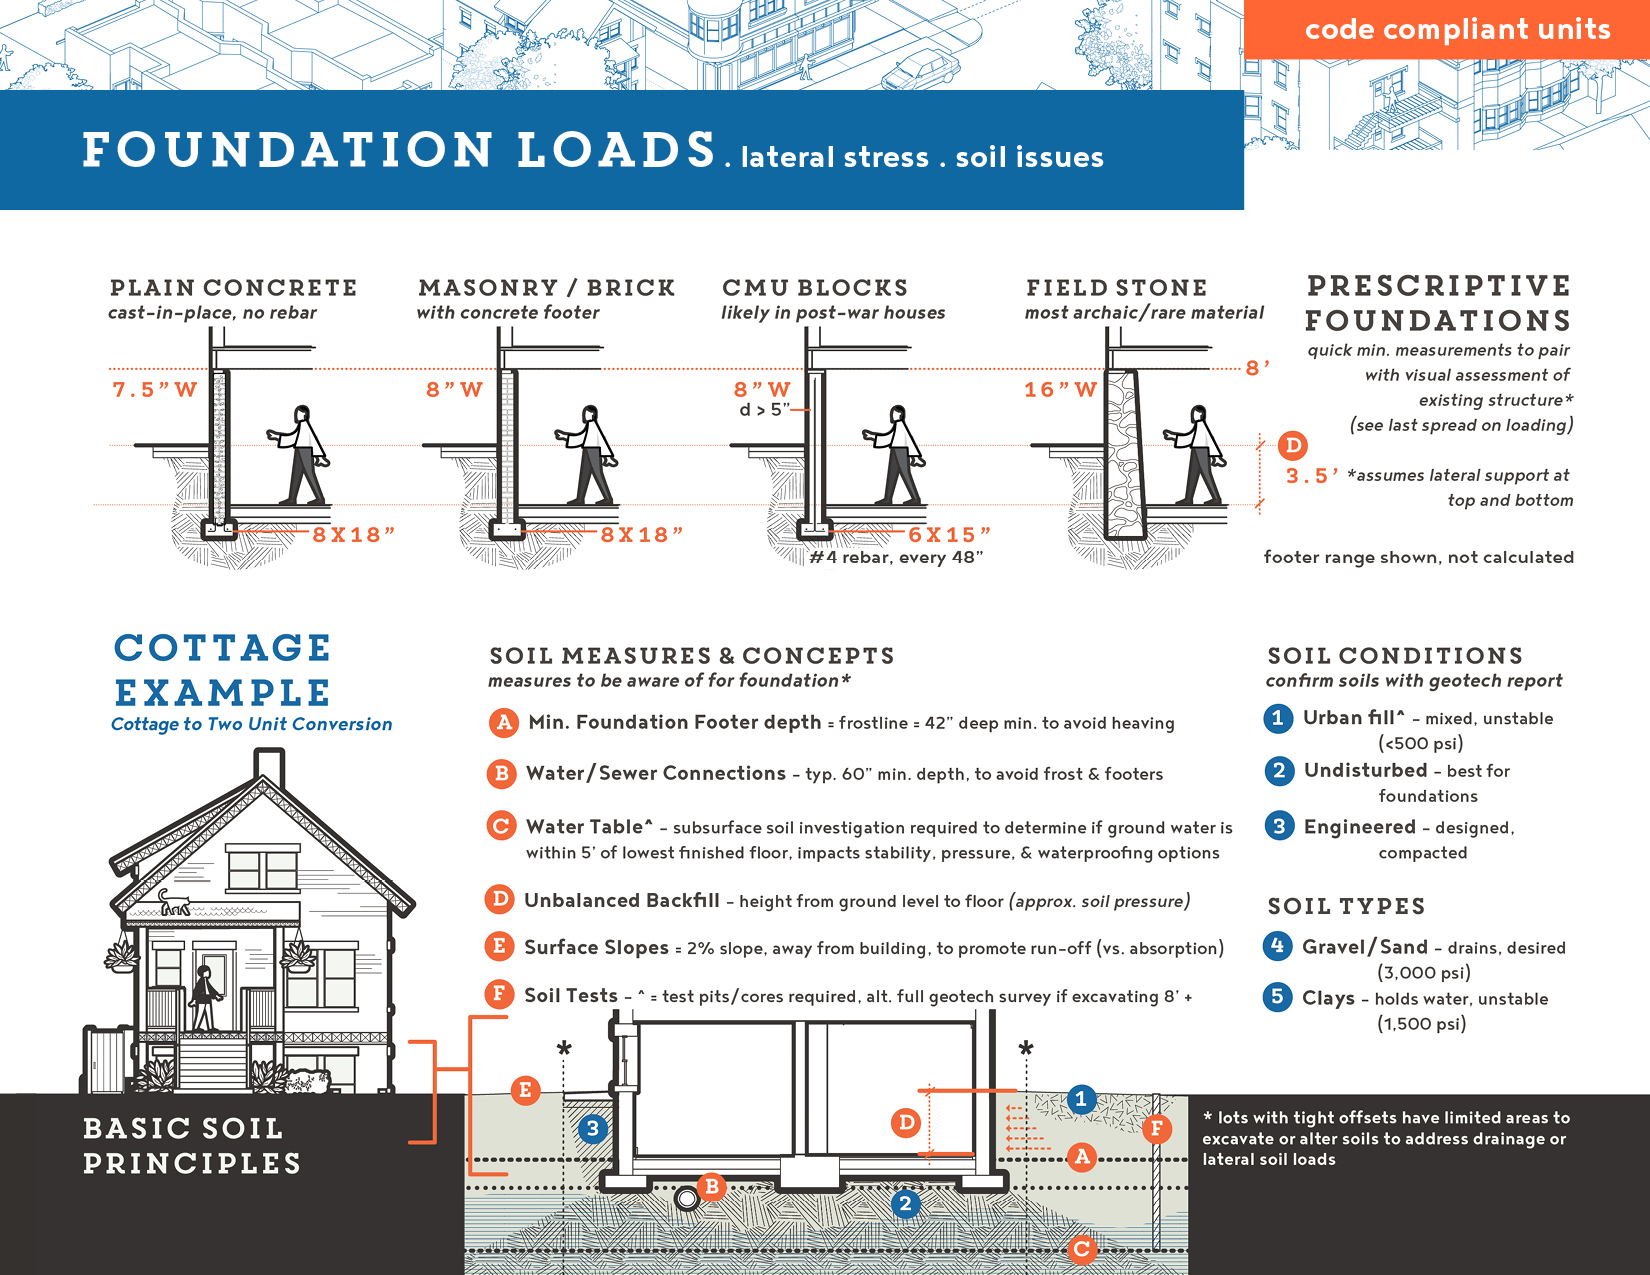
Building assemblies work together to transfer loads - like the weight of materials (dead load) or the weight of furniture and occupants (live load) - down to the foundation and, beneath it, the ground. Materials themselves, like soil, resist loading with compressive strength (right, Force Distribution). In addition to gravity, buildings face loading from all directions: wind, pressure exerted by soils and groundwater, and seismic tremors (right, Building Loading). Thus, a stable and safe structure requires multiple types of bracing, so joints and materials can transfer loads without twisting.
From your basement you can likely see much of the structure that is supporting your upper stories, carrying the load from floors, walls, and furniture above (right, Typ. Exposure Structure, A-E). Knowing where the first floor walls sit, you can anticipate where your basement joists are carrying greater dead loads. And, by measuring your foundations, through existing openings, you can estimate whether they are adequately sized to carry typical residential loads.
Before you add a ceiling or interior finishes, you should thus examine the overhead joists, foundation walls and any columns or load-bearing interior walls. Look for stains, strains, and signs of stresses (explored in the following questions) that indicate larger structural problems and material decay.
In fact, if you see any of the defects discussed you should consult a structural engineer or architect to assess potential failures.
documents & resources:
- Chicago Building Code - Chapter 16 - Structural Design, Rehab Chapter 4 - Structural Repairs, Chapter 18 - Soils and Foundations (summarized in drawings)
- Visual observation - walk around your basement and examine walls, columns, joists, and floor above - note spans, cracks, signs of bowing and decay - record issues to discuss with your structural engineer or architect
- Architect and/or Structural Engineer to verify found issues - joist deflection, foundation wall cracks and overturning - and identify loading sources and mitigation options
does your basement show signs of structural fatigue overhead:
Spanning / basement ceiling elements
1 2 Are there signs of excess loading on your joists or girders ? Are your sills and upper walls anchored to your foundation? (14B-16-1604.3, 14B-23-2308.4.2.1, new construction) (14R-4-405.2.4, structural repairs)
- Do your joists exhibit visible bowing and vertical deflection or twisting laterally (right, Joist Deflections)? Any visible bending or diagonal cracks (2, shear) are a sign of excess loading, misaligned joints or deteriorating structure.(14B-16-1604.3)
- Are your joists spanning larger distances than recommended? See diagram D. Long distances and excess spacing can mean each joist is carrying too much load.(14R-4-405.2.4)
- If your basement includes structural columns and girders, do the horizontal pieces show signs of deflection or cracking? Do the columns have decay? (14R-4-405.2.4)
- Are your sills and headers anchored to the foundation C to prevent uplift, lateral sliding, and transfer load to the foundation?
Existing Foundation Walls
Wall Issues
Are there signs of excess pressure from soils, site loads, or uneven settlement beneath the foundation?Note: graphic reference this and next slide (soils).
- 3 - Do your foundation walls either tilt or bow inward? This is a sign that the wall and its footer are failing to resist lateral soil pressure and are at risk of over-turning and collapse. This can be exacerbated by parking machinery near the foundation during construction. It can signal undersized footers, too-thin walls or inadequate anchoring between them.
- 4 - Do your foundation walls have any cracks? These also show that the wall is failing to resist soil pressures, or point pressure from tree roots or sodden areas. Cracks may be long forming or introduced by specific events. Take note of the distribution of cracks: uneven settling will likely have cracks down a wall, across your slab and up the opposite side. Areas of point pressure, like roots or equipment over-loading, will show crack spidering around the area of impact.
- 4.1 - Horizontal cracks, where one area juts into the center of the basement, are signs that specific vertical layers of backfilled soil are exerting uneven, excessive pressure, perhaps from undrained water or compaction.
- 4.2-4.3 - Vertical cracks are signs of uneven settlement of the foundation and underlying soils. One section is adequately supported, while the other area has sunk, with cracks forming between.
- 4.4 - Shear cracks are signs of shifting soils, along the wall surface, which are dragging blocks or bricks with them through friction.
All of these foundation cracks indicate unstable or active soils (to right, Soils: 1 or 5) potentially impacted by ground water and freeze-thaw dynamics. They could also indicate undersized or under-reinforced foundation walls. Consult with an architect or structural engineer for assessment and soil testing.
wall & mortar weathering
Are there signs of brick efflorescence? Are there areas of missing or cracked and crumbling mortar or spalling foundation materials (brick, concrete masonry, or stone)?
- Crumbly mortar and efflorescence both indicate that your walls are saturated with water. In brick, what you’re seeing are the salts leaching out of the bricks as moisture evaporates. Sand-like mortar shows that water was unable to evaporate and broke down the inner adhesion of the materials. Both are often seen next to spalling or cracking brick and block, as those materials absorb moisture, which then expands and contracts based on thermal fluctuations.
This form of decay is just as serious as foundation cracks as it also indicates groundwater and freeze-thaw dynamics. Consult with an architect or structural engineer for assessment and soil testing.
(^ in diagrams = conditions confirmed through soil testing)
 Slab & Foundation Drainage
In addition to structural stress, old basement walls and thin concrete slabs permit groundwater and radon seepage. This can spur mold growth, accelerate decay of structure & finishes, and contribute to poor/carcinogenic air quality. Thin slabs will not support new walls and additional loading.
Summary: For the health of occupants, any basement (unit) must be adequately water or damp-proofed, with a slab that has: vapor-barriers, radon exhaust systems, and adequate structural depth.
See Slab & Waterproofing details to learn more about slab structure, joints, and foundation-drainage systems.
Show/Hide Slab & Waterproofing Details

Slab & Foundation Drainage
Managing Moisture & Radon
As you examine your basement, note the condition of the floors and any lingering moisture. Look for cracks, caving, and wear in the slab. Often residential concrete slabs are poured as thin surfaces; they will not support new walls or furniture loads. See code-compliant slab sections, right, and replacement details, in ‘Mitigating Issues,’ associated with adding height, foundation drains, plumbing, and radon exhaust.
On the floors or walls, are surfaces clammy? Can you see condensation on walls or efflorescence on bricks? Are there leaks, in any weather, snaking toward the floor drains? If you ‘finish’ a unit despite these symptoms, this moisture is trapped in the walls and floors, accelerating rot and mold growth. To be safe for inhabitation, your basement unit should be either a) waterproofed or b) dampproofed.
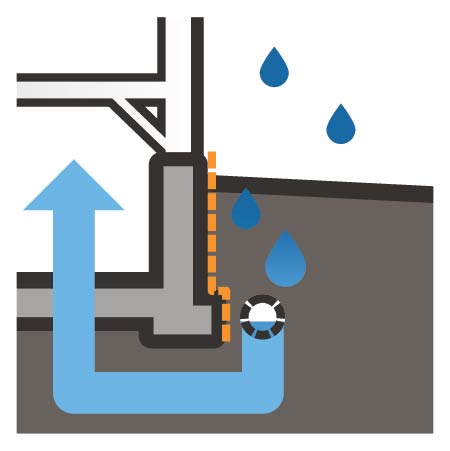
Waterproofed basements are lined with thick, impermeable membranes (Waterproofed: 1) that wrap the foundation walls and the concrete-slab for continuous enclosure. This is required when the basement sits within groundwater and has hydrostatic pressure on the foundations.
Dampproofed basements are lined with thinner materials, which often double as vapor-barriers, because they sit ‘above’ groundwater. This can be the result of natural drainage (Dampproofed: 2). Alternately, the foundations may have a tile drain system (exterior or interior) to intercept water, drain immediate soils and thermally isolate the interior (Dampproofed: 3, Slab StructureF).
documents & resources:
- Chicago Building Code - Chp 18 - Soils and Foundations, Chp 19 - Concrete (summarized in drawings)
- Visual observation - examine basement walls and slab for water, cracks, and wear. Record issues to discuss with technical experts.
- Architect or Structural Engineer to verify found issues and to calculate anticipated slab loads, structure
- Plumber to confirm existing drainage for adaptation; depth, path (straight or with bends), sizes of sewer connections to mains.
is your basement sound, dry, and radon free:
Is your slab intact and adequate for new loads (Slab Structure I)? (14B-19-1907)
- Does it have joints to allow for settling?
- Are there changes - in drainage, loading - requiring replacement?
Does your slab have a vapor-barrier beneath (Slab Structure E, N)?
- Are there venting pipes to exhaust radon away from occupants? (To learn more about the carcinogenic risks of radon and exhaust systems, see ‘Mitigating issues’) (14B-19-1907)
Is your basement visibility dry or are there stains or high-water marks from flooding? Is there damp or waterproofing in place (Waterproofed; Dampproofed)? (14B-18-1805)
- Creating a dry basement will depend on soils, elevation, and geotechnical testing to confirm groundwater control options. See ‘Mitigating Issues’ for how interior and exterior drainage integrates with sump pumps and site grading.
 Utility Requirements
A basement unit needs working plumbing, an adequate number of outlets and lights, and thorough heating to maintain a comfortable environment of 68F (at -7F outdoors). Building systems like heating, plumbing, sewage, and electricity should be considered spatially —what can/can’t be appended efficiently— and in terms of loading —like assessing pipe diameters for gas, water supply and drainage or the amperage to support new circuits.
Summary: Single family homes, if adding a unit, are likely to need new plumbing, gas, and electric connections to support utility loads and shared/public usage of common areas. Two to Four-Flats may have extra capacity. Connections (and additional slab work) are fairly expensive and must be considered when budgeting a project (see 'Mitigating Issues').
Expand the Utilities slides to learn more about electric, plumbing, and heating systems, capacities, and constraints.
Existing & Proposed Utilities, Summaries
Systems & Rough Estimates
Electric
Plumbing: Water & Sewer
Heating: Gas
Existing Utility Connections & Sizing
principles for utility connections & services:
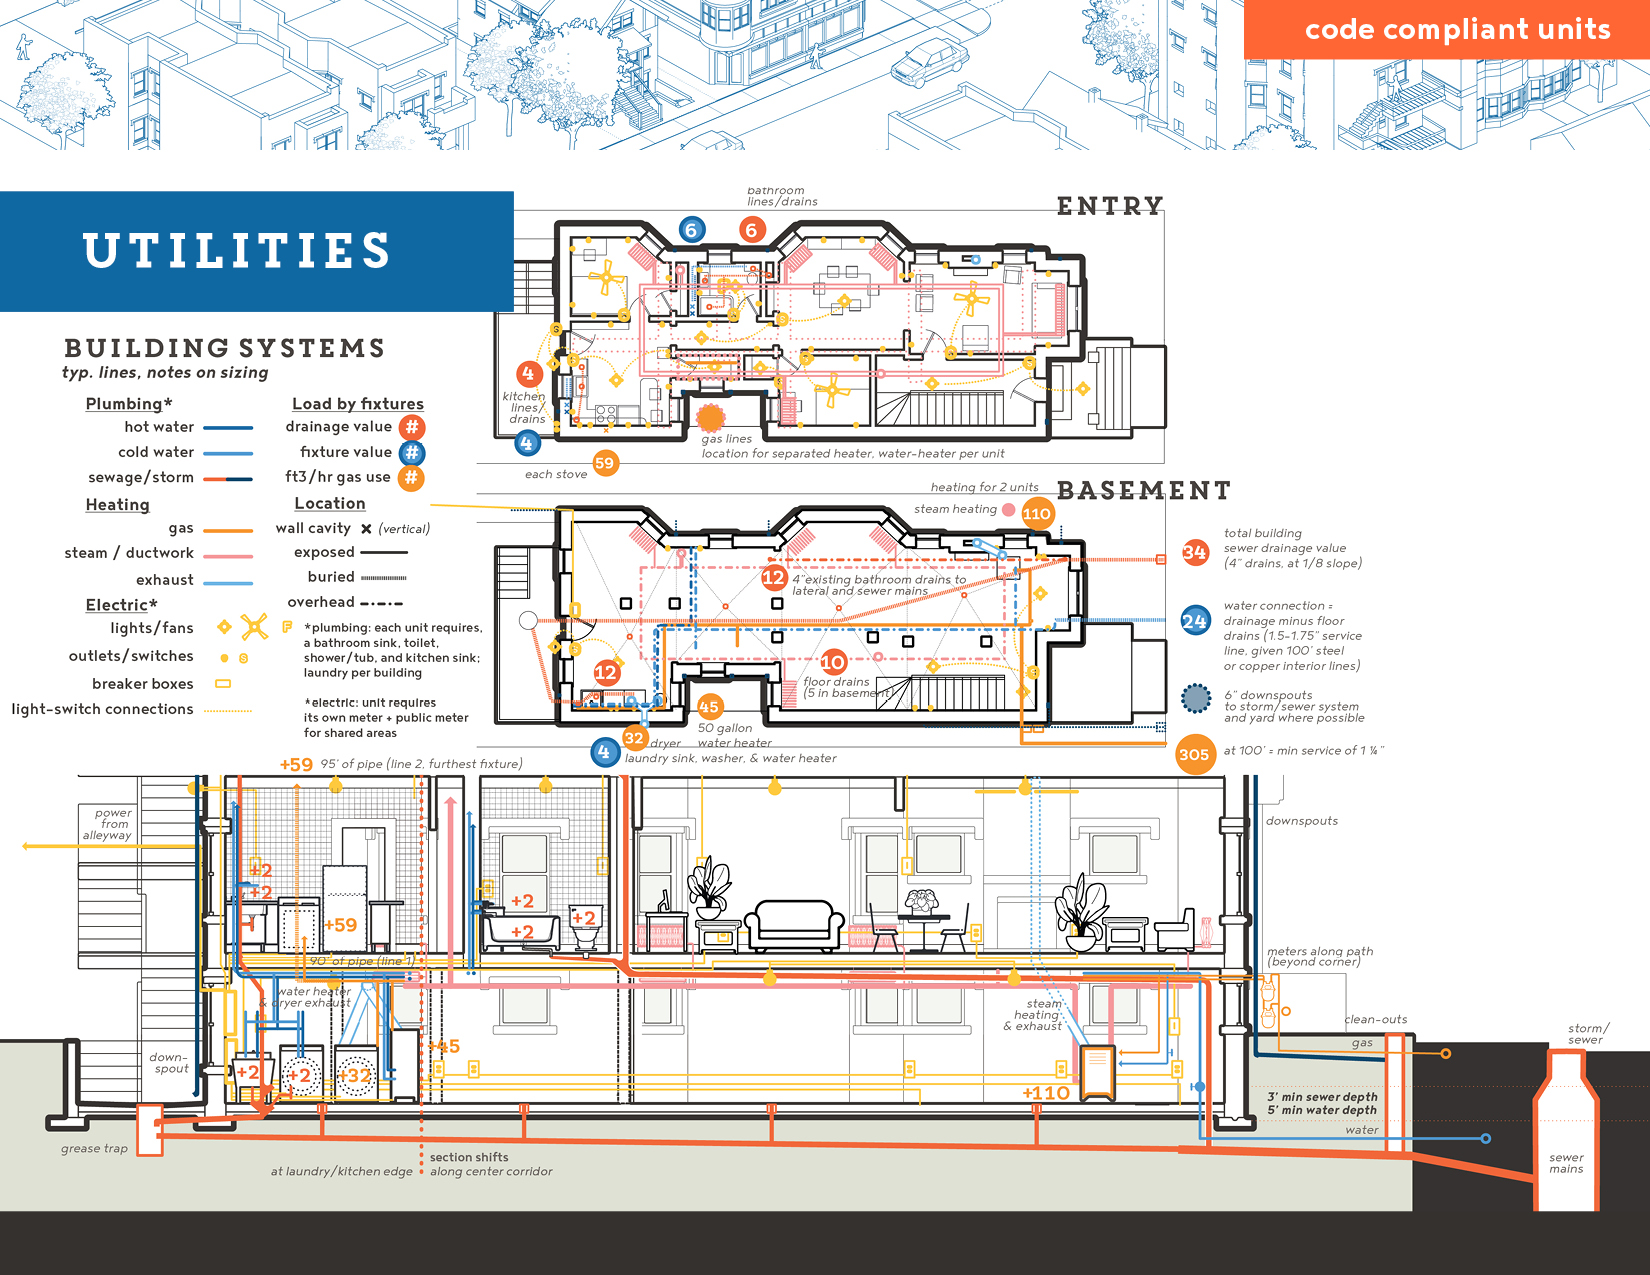
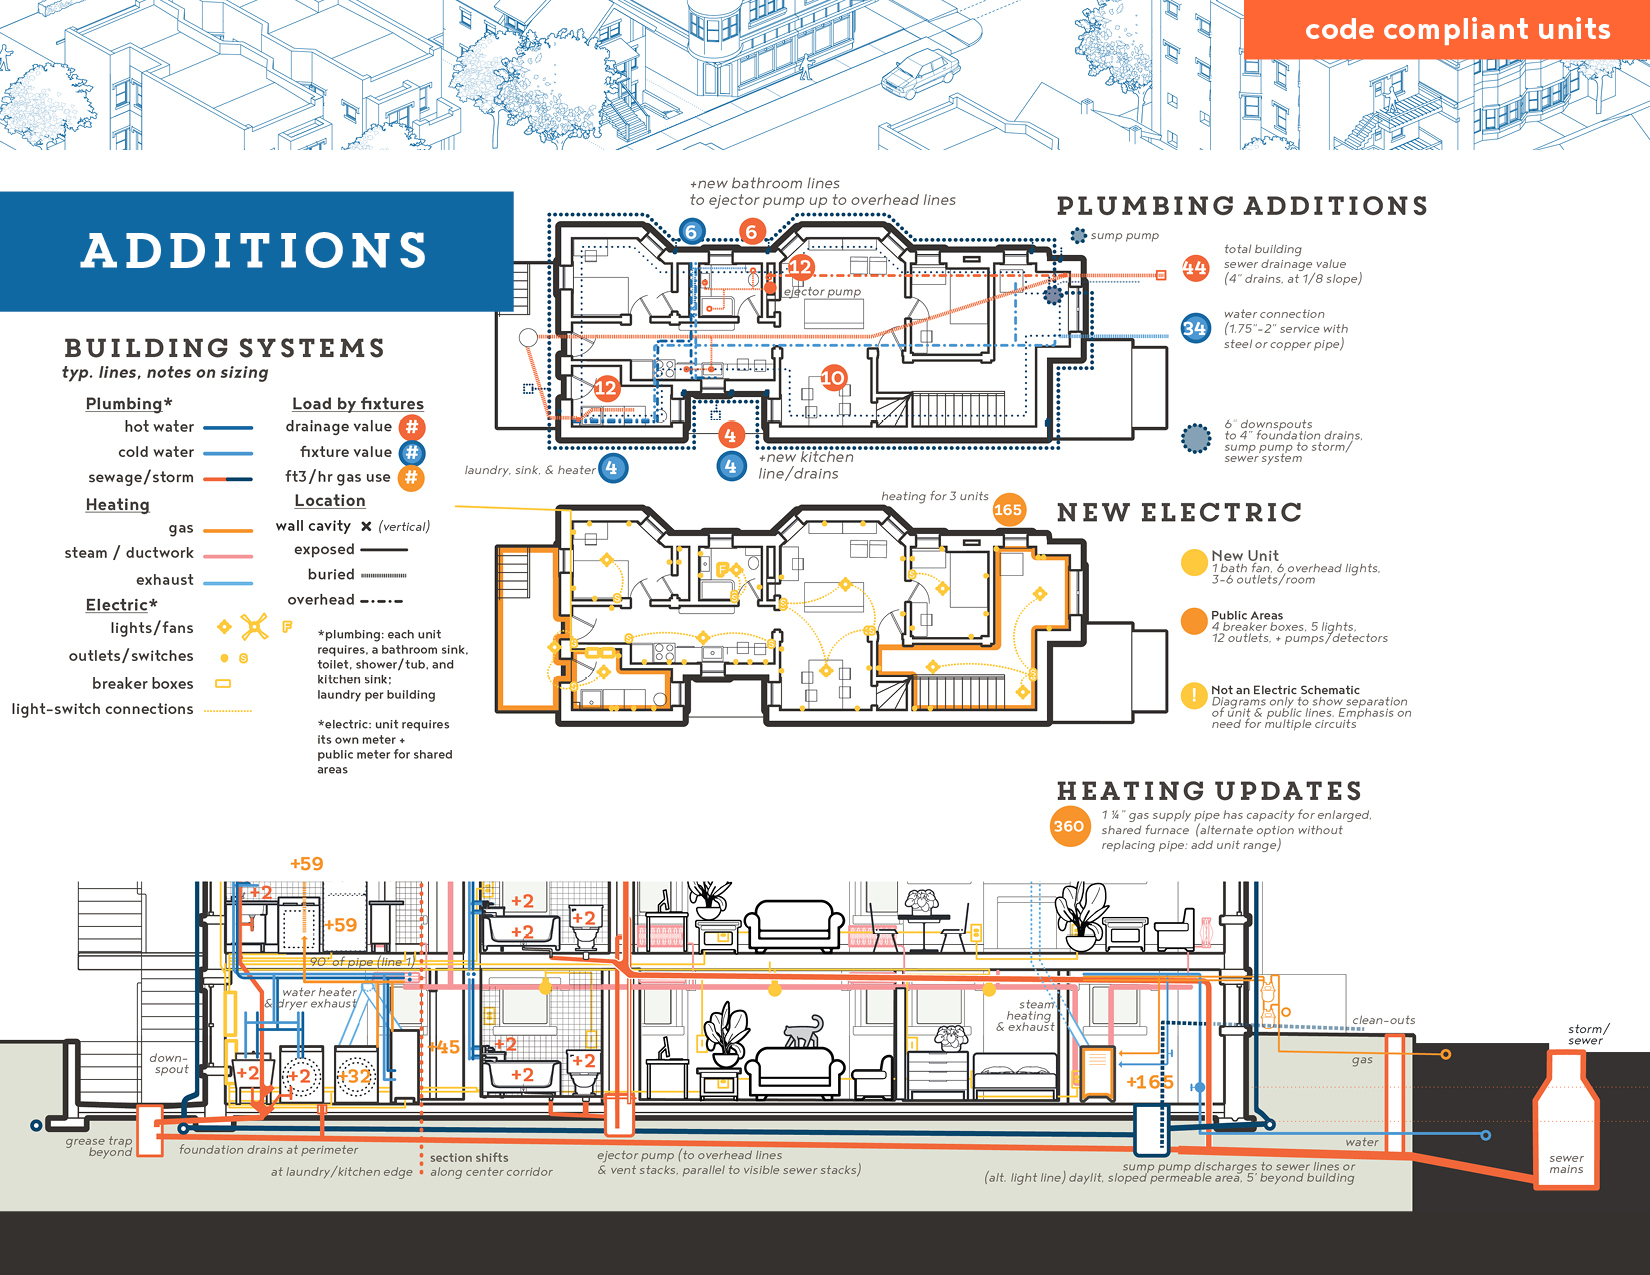
A basement unit needs working plumbing, an adequate number of outlets and lights, and thorough heating to maintain a comfortable environment of 68F (at -7F outdoors). Building systems like heating, plumbing, sewage, and electricity should be considered spatially—what can/can’t be appended efficiently—and in terms of load or capacity—number of fixtures enabled by size or volume of supply. You’ll want to minimize the impact to existing units, so be prepared to work around vertical drainage and potentially align sewer additions along existing overhead lines.
Older buildings are more likely to have inadequate capacity and will require additional lines or resizing sewer/water connections to City utilities (see ‘Mitigating Issues’). You’ll want to incorporate the costs of adding additional meters and lines into your overall estimate ($15,000-$20,000). Segregating systems and/or supplementing existing systems can help avoid underpayment, enable tenants to use utility subsidy programs, and meet livability codes. That said, old buildings often have steam heat or similar systems designed to service all units. Consider how to add supplemental systems to meet code and separate lines, like adding a forced-air heater in the basement, without disturbing the upper stories of existing steam distribution.
It’s also important to understand the elevation and location of sewer lines—either overhead (runs across the basement ceiling) or below the slab (beneath the basement floor). If your sewer connections are overhead, you will need an ejector pump to meet your existing sewage connections. For either system, you’ll need to vent any new connections to release sewer gas and provide maintenance access, like clean-outs and traps (see ejector pump and access details in ‘Mitigating Issues’ ). Your other drainage lines—roof downspouts, areaway drains, and foundation drains—will need a sump pump to lift and carry water away from your foundations (see details in ‘Mitigating Issues’).
As a building owner you can do rough estimates by noting existing connections, meters, fixtures, and lines, as shown in the plumbing, electric, and heating diagrams and tables on the following pages.
You will need an architect to consult with plumbers, electricians, and heating specialists to fully assess the condition of your existing systems and develop an integrated strategy for additional loading and utility connections.
The sample ‘Two-Flat’ system diagrams as well as the system sizing tables (below) are meant to help you feel comfortable integrating existing details and calculations, in order to actively engage trade specialist. Fully calculating the system sizing will need to take into account details like pipe types (for friction), the highest fixture elevation, and total system length for estimating pressure.
documents & resources:
- Chicago Building Code - Chp 12 - Interiors, Chicago Electrical Code - 14E, Chicago - Building Infrastructures Code - Chp 18 - Plumbing and Mechanical Codes
- Visual observation - Note the location of utility connections, meters, and size of any exposed pipes. Determine location and capacity of any heating, electric, or plumbing appliances and fixtures.
- Architect and/or Contractor in coordination with plumber/electrician/heating specialist to assess existing systems and potential for adaptation.

Electric Connections
What do you need for a new unit:
Have you consulted with an electrician about needed capacity?
- Anticipate connecting kitchen appliances and two to four sets of outlets and lights in all rooms, with GFCI outlets in wet areas.
- Given any new layout, occupants will need to access their meters and breakers for maintenance.
- For any multi-unit building, you will need one metered electric service for each unit and one for the public areas - hallways, laundry, stairwells, and fire-escapes.
- With old buildings that lack separated electric, it’s common to replace the entire building’s wiring. Tracing and disentangling old wiring is time consuming and oft confirms the need for replacement. See ‘Mitigating Issues’ for new line options.
Electric loads:
In an electric system, current flows from a power source through a circuit—with appliances and lights that use that power—to a neutral line which carries residual current to the ground. Switches and breakers serve to break circuits and stop electric flow to specific elements or entire lines. Each electric meter tracks the watts pulled in for your unit.
Akin to sizing plumbing or gas loads (below), your electric system is sized to support a set number of appliances per circuit (each rated for wattage). The flow of electric current (in amperes, per circuit breaker) * the differential power (120 or 240V) = total power wattage available per circuit. For safety, most circuits use 60-80% (max) of the available wattage and are properly grounded.
Your electrician will calculate the power drawn and used when adding metered service and circuits. See ‘Mitigating Issues,’ electric details for an example circuit calculation.
Plumbing: Sewer & Water Connections
What do you need for a new unit:
Have you consulted with a plumber about the capacity and location of the sewer system?
- Given an additional kitchen sink, dishwasher, and bathroom fixtures, do you know the current height and diameter of your sewer connections, to anticipate capacity and the need for pumps (18-29-710, 18-29-712)?
- Will your new unit incorporate additional clean-outs, backflow valves, and access panels to facilitate system maintenance and avoid sewage overflows in the lowest level (18-29-708, 18-29-715)?
- Confirm the location, elevation, and direction of your lateral connection - from your basement lines to the sewer main. Any extra elbows in the pipe can act as obstacles.
Have you consulted with a plumber about the capacity and location of the water system?
- Because a new unit requires a full kitchen and bath, you will need an additional or enlarged water connection. This likely won’t be flagged on your permits. Make sure to incorporate line (and meter) addition to avoid belated installation (with all the implied site, slab, and finishing work). See the fixture and pipe sizing calculation at the end of this section.
- Older, single family homes may not be metered. You will want to add meters to new units, but, as with sewage, you can use this method to anticipate the bills/loading for each unit. See the Municipal Code 11-12, Water Supply and Service (11-12-260).
Rough Capacity Estimates: Sewer
You can make an informal tally of plumbing capacity. Make a rough count of all the plumbing fixtures (tubs, toilets, sinks) attached to each of your major vertical drainage pipes and find their drainage values on Table 18-29-709.1 .
- For sewers, measure the pipe size and confirm capacity estimates on Table 18-29-710 A and B. Could you install additional fixtures, given allowed unit values and required 4” pipe beneath ground?
- Add roof drainage (18-29-1108.1) to get a rough sense of your needed drainage capacity.
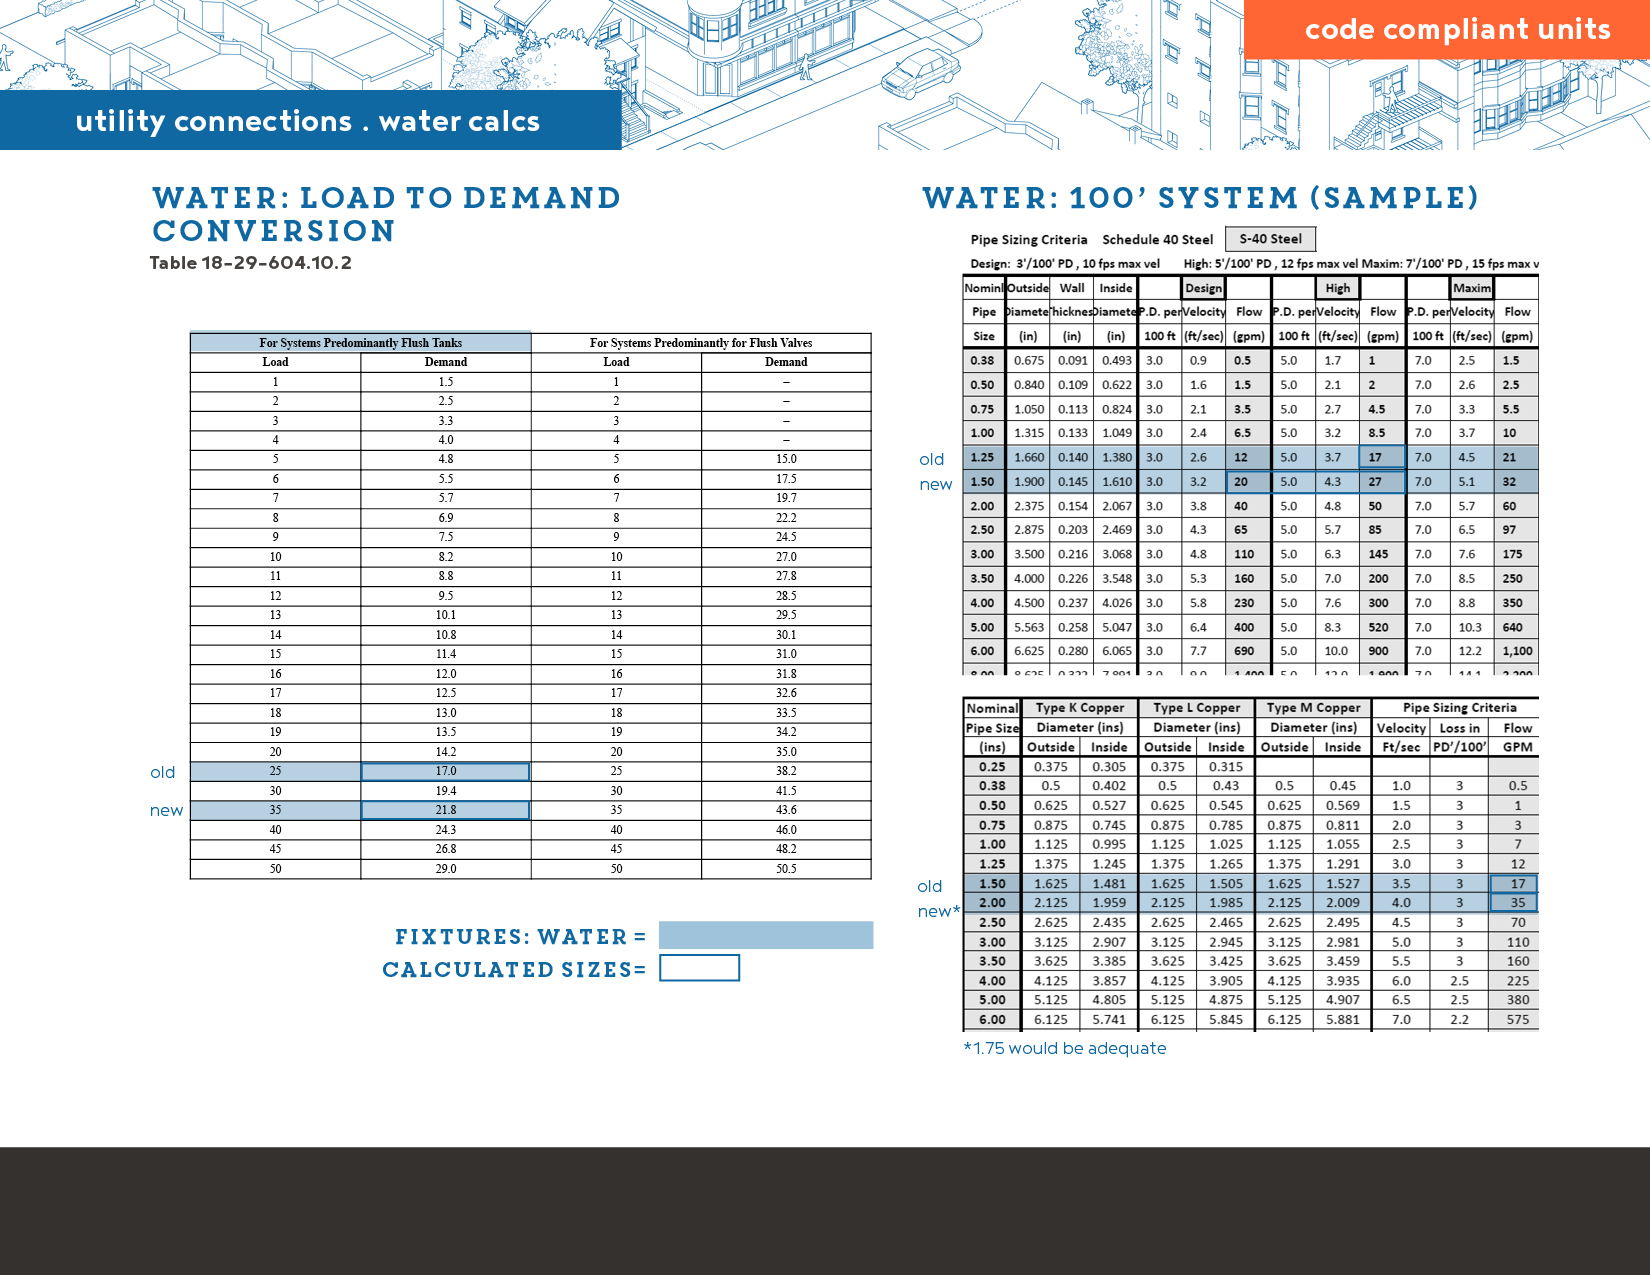
Rough Capacity Estimates: Water
- For water, make a rough count of all the plumbing fixtures (tubs, toilets, sinks) on Table 18-29-604.10.1 (water).
- Take this fixture total and convert the value into demand (in gallons per minute) on Table 18-29-604.10.2. Find the connection size equivalent for a 100’ system (for steel or copper pipes). (As with the zoning example, highlights match the proposed Two-Flat conversion.)
- Fully calculating the system sizing, esp. for water, will need to take into account additional details like pipe types (for friction), the highest fixture elevation, and total system length for estimating pressure.
Heating: Gas Connections
What else must you account for with Utilities?
Does the plan for your basement unit account for the interconnection of different building infrastructure/services? Most building systems involve multiple connections and negotation with walls and structure. Consider the following examples:
- Fossil-fuel burning heaters (water heaters, forced-air units) require intakes, exhausts, and heat distribution systems. (See ventilation in ‘Mitigating Issues’)
- Drainage pumps typically connect to your storm/sewer mains but also require two power circuits, which act as fail-safes (18-29-712).(See drainage and plumbing in ‘Mitigating Issues’.)
Because of such interconnections, planning a new unit should be done with professionals, given their assessment of existing building systems.
Rough Capacity Estimates: Gas Heat
Akin to plumbing, gas is distributed through a series of pressurized pipes, as diagrammed on page 80. Broadly speaking, gas lines step down in size. A larger capacity and diameter pipe supplies the meters. This splits to serve distinct unit lines and branches internally, with each new section serving fewer appliances, thus requiring less fuel and smaller diameter piping.
As with water flow, you can estimate existing gas flow and current pipes’ capacity to support extra appliances. Make a rough count of your gas appliances (range, dryer, etc.) and find their typical fuel usage in cubic feet, on Table Appliance Fuel Usage. Sum these values to estimate current gas usage, in cubic feet.
To calculate the necessary connection size, measure the distance from your meter to the furthest gas appliance. In the example, this would be the second floor gas range which is approximately 95’ from the meter. Find this length on the Table Gas Pipe Capacity (round up as necessary) and find the column, moving right, that matches or just exceeds the usage sum (305 ft3/hr in the example). At the top of the column is your estimated gas connection size, at the meter.
If your current piping matches the nominal pipe size and your fixture usage sum is less, you likely have capacity for heating upgrades or new appliances. Use the Table Appliance Fuel Usage to estimate viable additions.
Reminder: All rough utility estimates should be followed by strenuous professional assessments to confirm capacity and work required for a new unit.
Proposed Utility Connections & Sizing
Sample Unit: Proposed Utility Updates
Building upon the existing systems, this spread suggests likely adaptations and interventions in a Two-Flat basement. As much as possible, placement of new plumbing fixtures have aligned with existing water and sewer lines for service, drainage, and exhausting sewage gas. Assuming separated service between public spaces, first, and second floor units, the existing basement circuit is kept for public use and a new electric system is added for the basement unit interior. Heating connections are left as is, given overhead steam-lines and radiators, which are common in older, multi-flat units.
 Height & Area Requirements
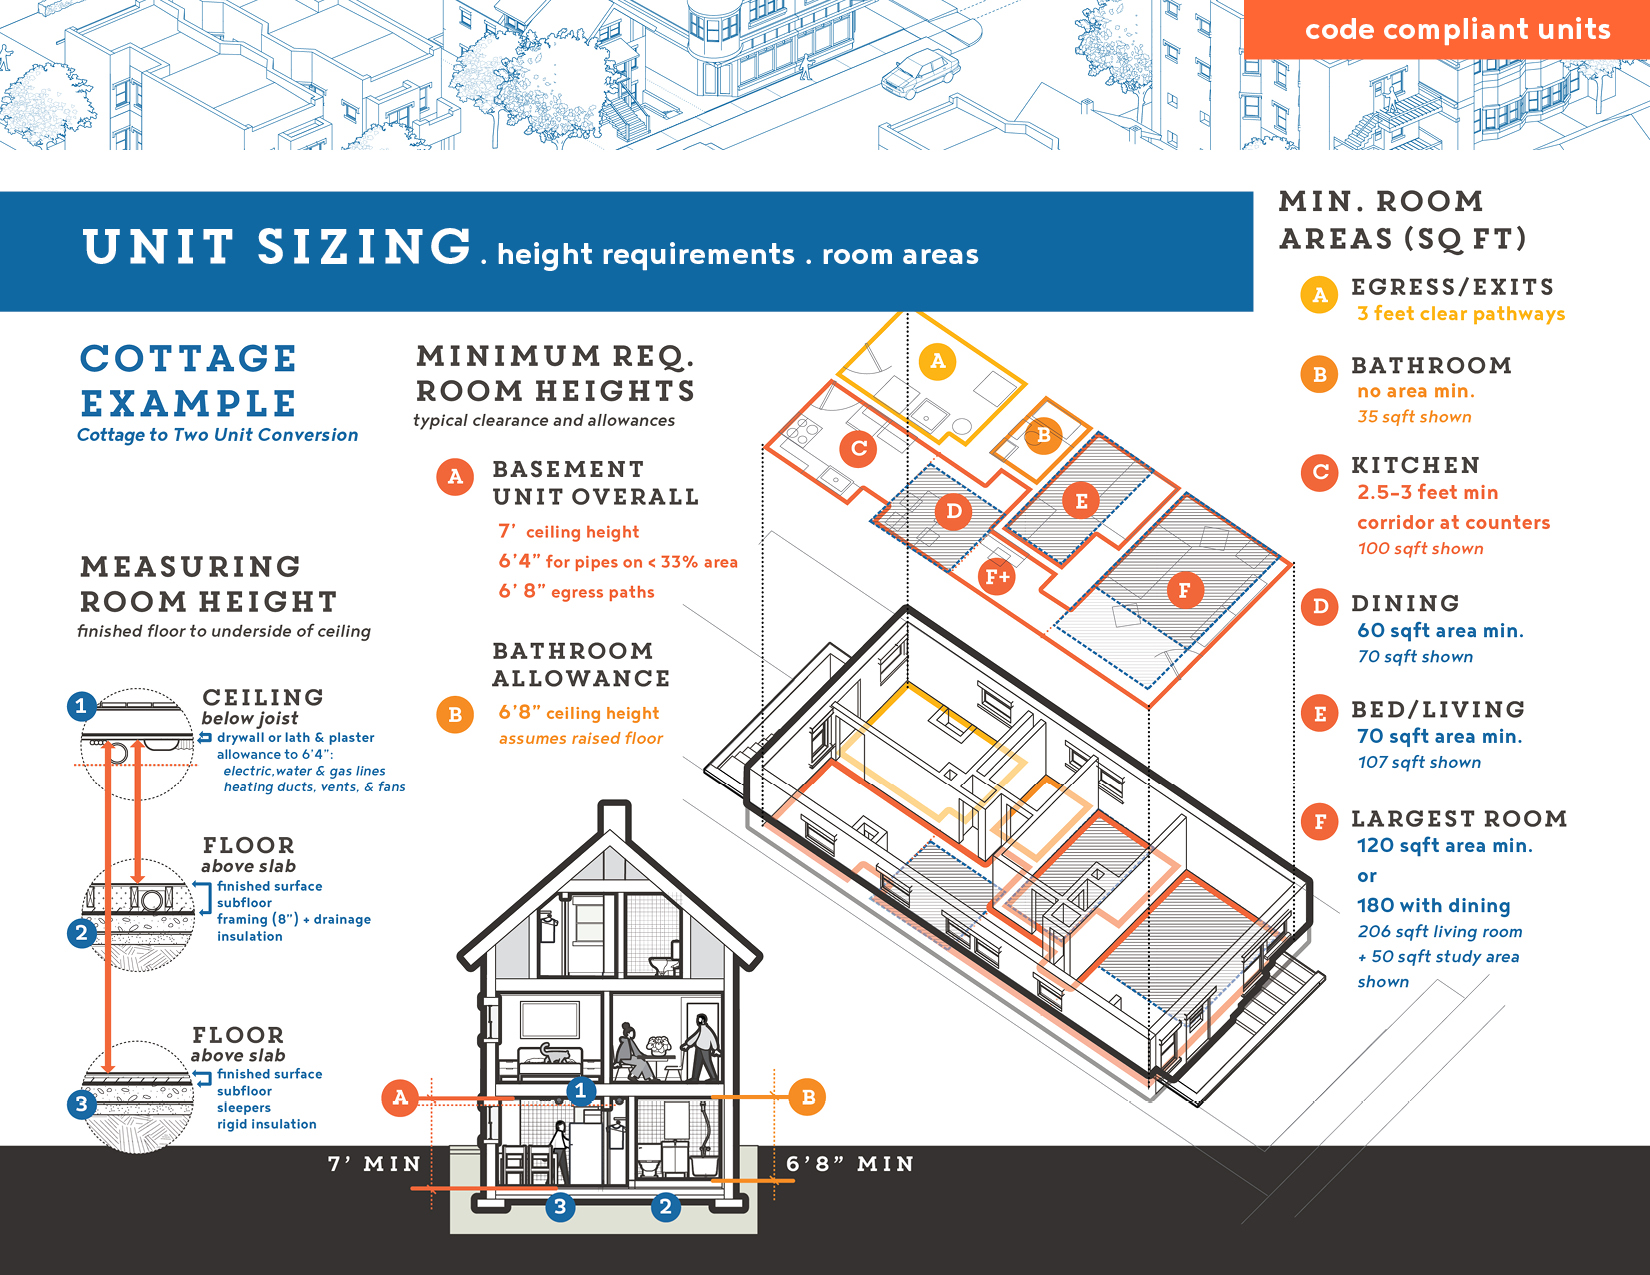
It is critical to make sure your basement has enough room for a decent and legal apartment. You'll want nearly 8' in an unfinished space to create a 7' tall unit without excavating around your foundation (expensive, risky). Likewise, you will need to have ~400-500 sqft to carve out required bedroom, living, kitchen, and bath spaces.
Summary: Height is a common limitation to developing a basement unit (7' finished) and affects the ability to create adequate spaces, light, and ventilation opportunities (next section).
See details for required height and area, by room.
Show/Hide Size & Height Details
Interior Height & Area Minimums
Principles behind height and size requirements:
It is critical to make sure your basement has enough height and area for a decent and legal apartment. The required dimensions are minimums meant to avoid overcrowding.
Unfinished basement height should be nearly 8 feet, on average, to allow for upright posture, accommodate building materials, and avoid pipes acting as obstacles to movement (Minimum Req. Room Heights). As you measure, leave a foot margin for insulation and finishing on floors and ceilings (Measuring Room Heights). (14B-12-1207)
Room areas should be between 60-120 square feet (min.), ideally fitting between existing, load-bearing structures like columns and walls. Make sure to leave common areas, for access to breaker boxes, meters, and laundry, as you carve out space. (14B-12-1207)
For comparison, measure your existing units to understand room sizes. On your slab, use chalk to ‘draw’ out walls (~6” thick), doors, and typical furniture; can you navigate comfortably in these imagined spaces? Ultimately your architect will work to refine and develop any new unit’s layout and coordinate building systems updates.
documents & resources:
- Chicago Building Code - Chp 12 - Interiors
- Measurements - current basement size, with interior dimensions wall to wall, floor to ceiling
- Sketch of new unit with room designations - see also air/light, egress, utility connections, and structure, which may impact layout
- Architect to ultimately draw and stamp the final plans for your new unit, in order to apply for construction permits
do you have the space for a new unit:
Does your basement have adequate ceiling heights for a new unit (Minimum Req. Room Heights)? (14B-12-1207.2 - exception 1)
Does your planned kitchen have decent workspace at the counters (Min. Room Areas: C) ?(14B-12-1207.1)
- If accessibility is a concern, 30-36” workspaces should include lower cabinets, grab bars, and wheelchair turning radii. See Accessibility Code for Dwelling Units (14B-11-1107).
- The kitchen (or living) may also include the 60 sqft dining area.
Are your main living, sleeping, and dining rooms adequate to meet the minimal area standards at right (Min. Room Areas: D, E, F)? (14B-12-1207.3)
- The required bathroom fixtures - a sink, toilet, shower/tub - will determine the minimal areas in a bathroom. (Min. Room Areas: B)
 Light & Ventilation Requirements
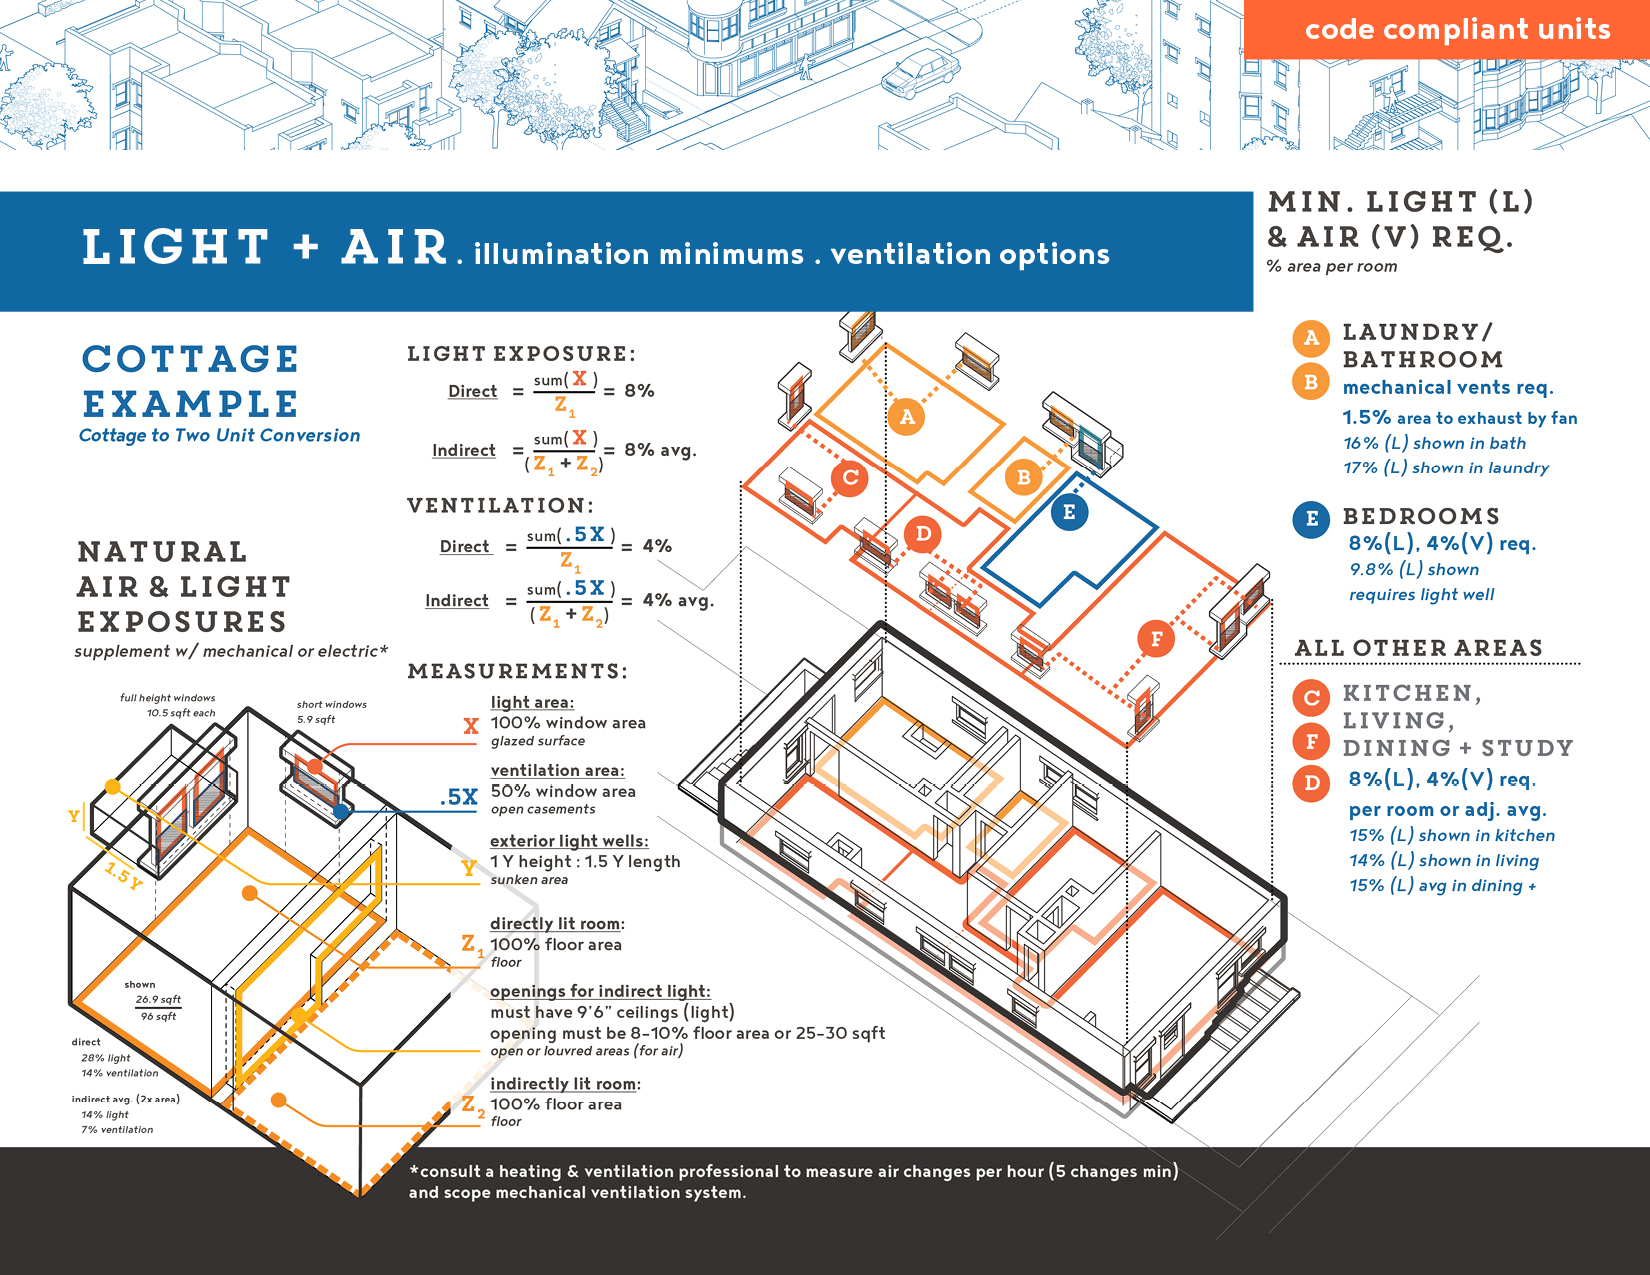
It is imperative that any new basement unit meets or exceeds the code’s ventilation and lighting requirements (approx. window areas = 4% (air) and 8% (light) of room area, with use & adjacency allowances). Sheltered at/below grade, basements often have small windows, poor air circulation, and excess humidity. Combined, these factors foster condensation and mold, degrading materials and threatening the tenant health.
Summary: Inadequate natural ventilation and light is common in basements, with window and vent placement constrained by structural loading and property boundaries. If you have a dark or dank cellar, consult with a heating/ventilation specialist and structural engineer to determine options for making a dry, light interior.
See details for specific exposure areas.
Show/Hide Light & Ventilation Details
Light & Ventilation Area Minimums
Principles behind light and ventilation requirements:
It is imperative that any new basement unit meets or exceeds the code’s ventilation and lighting requirements (left, Min. Light & Air). Sheltered at/below grade, basements often have small windows, poor air circulation, and excess humidity. Combined, these factors foster condensation and mold. Adequate ventilation and light combats mold and mildew, and improves quality of life. Your architect will confirm air and light calculations and coordinate with specialists. That said, you can anticipate potential issues and estimate for compliance by making a few measurements using the metrics noted below.
Natural light is easy to estimate. (right, Calculating Air & Light Exposure) Measure the area of windows currently in your basement and pair them with anticipated room sizes. For adequate daylight, the area of windows in any room must be at least 8% of the floor area (note indirect light/adjacent room options for high ceiling areas)(14B-12-1204.2.4). An electrician can estimate artificial light levels for access stairwells and new rooms.
To estimate natural ventilation, imagine all the measured windows open (50% area for air flow) and calculate as you did above(14B-12-1202.5). Do you have 4% of air-flow area per each room area? To informally check for excess humidity, tape tinfoil to the walls (all edges) and, after two days, check for water. Moisture on the wall indicates waterproofing issues; moisture on the exposed side shows condensation. As air movement, condensation, and evaporation rely on cross-ventilation (facing windows) and air-pressure dynamics, you should hire a ventilation professional to confirm the rate of passive air change—how long it takes for all new air to enter a space with windows closed—and advise on mechanical ventilation and dehumidification.
See openings section, in ‘Mitigating Issues’ for constraints in adding foundation windows.
documents & resources:
- Chicago Building Code - Chp 12 - Interior Environment
- Measurements and layout used for sizing + measurement of ground level and offsets, as limits window well sizes
- Mechanical/Heating professional to perform blower tests (14B-12-1202.1 exception 1) and install vents, Electrician to assess artificial light levels
- Architect to confirm calculations, coordinate w/ tech.professionals
do you have air and light for a new unit:
Does your basement have adequate natural light for residential use (Min. Light & Air)? (14B-12-1204.2.4)
- 8% for all rooms, or 8% average if counting indirect lighting
Have you confirmed adequate artificial light with an electrician? (14B-12-1204.3)
- Room lights must provide 10 footcandles, at 30” h
- Stairwell lights must provide 1 footcandle on treads
Does your basement have adequate natural ventilation, in all seasons (Min. Light & Air)? (14B-12-1202.5)
- 4% for all areas, calculated by room or averages
- 5 air-changes per hour by infiltration
Do your new bathroom(s), kitchen, and laundry rooms have mechanical ventilation? (14B-12-1202.1)
- Fans must have openings of 1.5% * area of the room they ventilate.
If you need to increase window areas, do you have space for window wells (Exterior Light Wells)? (14B-12-1204.2.6)
- Can you add light wells (1.5:1 ratio) within your lot?
 Egress & Fire Exits
Fire safety is a key aspect of building code. In your new unit, all rooms must allow for egress, i.e. that all occupants can efficiently leave the building in an emergency. Broadly, the code requires paths within halls or stairs that are a) built of fire resistant materials (next section) and b) facilitate the unobstructed movement of occupants outward.
Summary: For smaller multi-unit buildings, the code specifies number of unit exits (one to two) and distances to exits (60' max) in order to limit lethal accidents.
See details for exit system components and requirements for exit stairs, halls, and doors.
Show/Hide Egress & Fire Exit Details
Fire Egress: Exits & Pathways
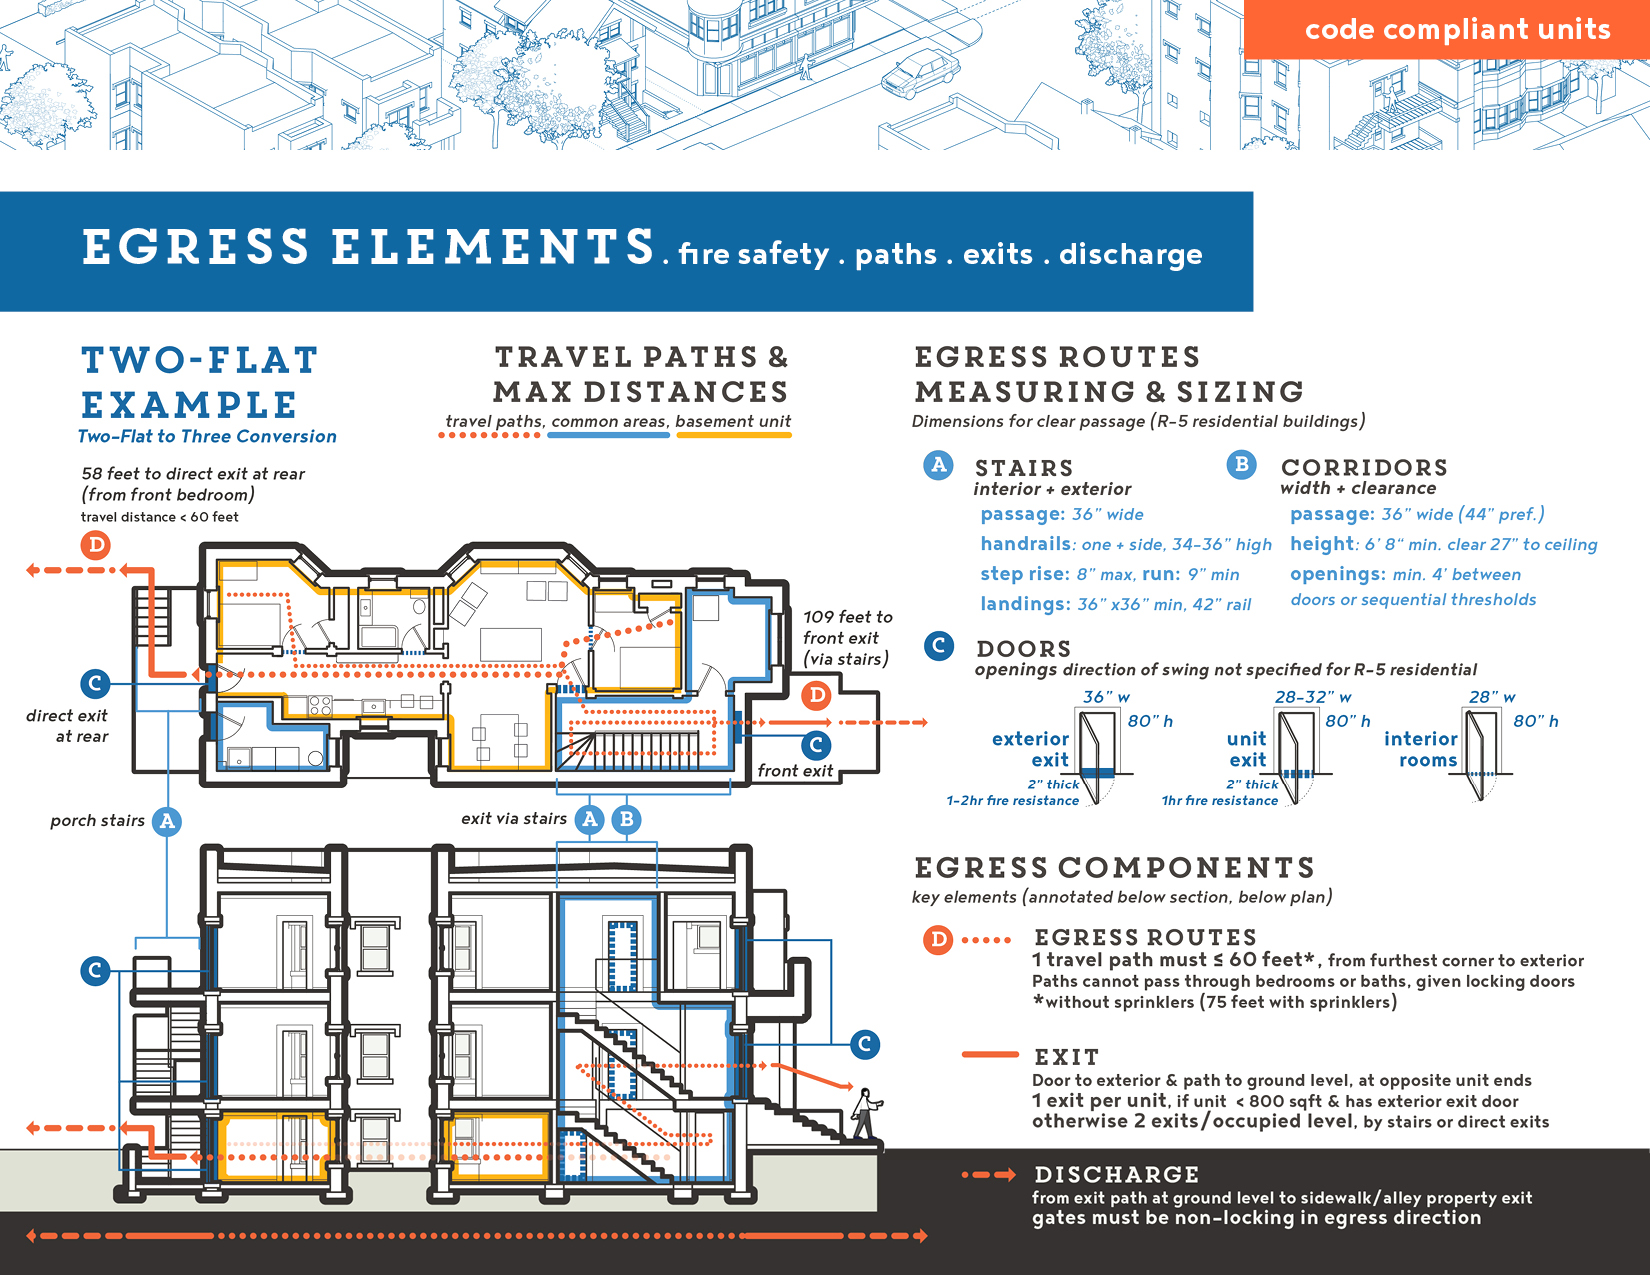
Fire egress (i.e. exit) elements
Fire safety is a key aspect of building code. As you layout your new unit, you’ll want to make sure all rooms allow for egress, i.e. that all occupants can efficiently leave the building in an emergency. Broadly, the code requires paths within halls or stairs that are a) built of fire resistant materials (see next page) and b) facilitate the unobstructed movement of occupants outward.
As noted in ‘Egress Components,’ an egress system has three parts to consider:
- Egress routes: pathways to an exit from within a building, passing through units, common areas, and stairs. The code specifies ‘travel distance’ as the longest distance allowed between the opposite corner of a unit to an exterior exit, as a human would walk.
- Exits: building exits are located on the exterior walls and release occupants to the outside. Exits can include exterior stairs, which connect with the ground, or ‘horizontal’ exits that release occupants at grade.
- Discharge: pathways from an exit to the street or alley at the edges of a property. Residential discharge paths can have locking gates at the edges of a property.
documents & resources:
- Chicago Building Code - Chp 10 - Means of Egress (summarized in drawings)
- Measurements and layout used for sizing to determine egress pathways and travel distances (see also air/light, utility connections, and structure as those elements may impact paths and hallway placement)
do you have needed fire exits:
Does your basement unit have a direct exit, from within the unit, or two exits via common hallways? (14B-10-1006.2.1, 14B-10-1006.3.2, 14B-10-1006.3.3)
- If planning additional exit doors, they are required to be at opposite ends of residential buildings.
- The same physical concerns apply to adding doors to foundations, as when adding windows (with 3’ exit landings in place of window well requirements).
Is at least one route of travel under 60’ (no sprinklers) or 75’ (with sprinklers):
- Measure the distance of travel from the furthest corner of the furthest room opposite the exit.
- For paths on stairs, measure on a diagonal, parallel to the steps, along the staircase center.
- Routes of egress can not cut through bedrooms or bathrooms from other rooms, due to their locking doors.
Are all the passages and doors along your egress route adequately sized - both within unit and in common spaces (Egress Route Sizing)? (14B-10-1003.3.1, 14B-10-1003.5)
- If space does not permit, you may retain older, steeper stairs but with adequate railings and clear space.
- If your basement is lower than adjacent exits and areaways, it is permissable to have two steps up (max) to exit a story.
As you consider the impacts, beyond a single unit, ask yourself the following:
- Are the egress systems in your building adequate for all residental units?
- Have you considered how new, exterior exit doors might integrate with your foundation walls and site?
 Fire Safety
In addition to egress, the building code also addresses fire hazards through containment, suppression, and detection systems - ‘fire walls’, sprinklers, and alarms. A new unit must incorporate, at minimum, containment and detection systems. Small multi-unit residences and Two-Flats are not required to have sprinkler systems.
Summary: You will need to have fire partitions between units and common areas, as well as a number of smoke and carbon monoxide alarms within units and stairwells.
See details for alarm requirements and burn-resistance of partitions.
Show/Hide Fire Safety Details
Fire safety: Alarms & Containment
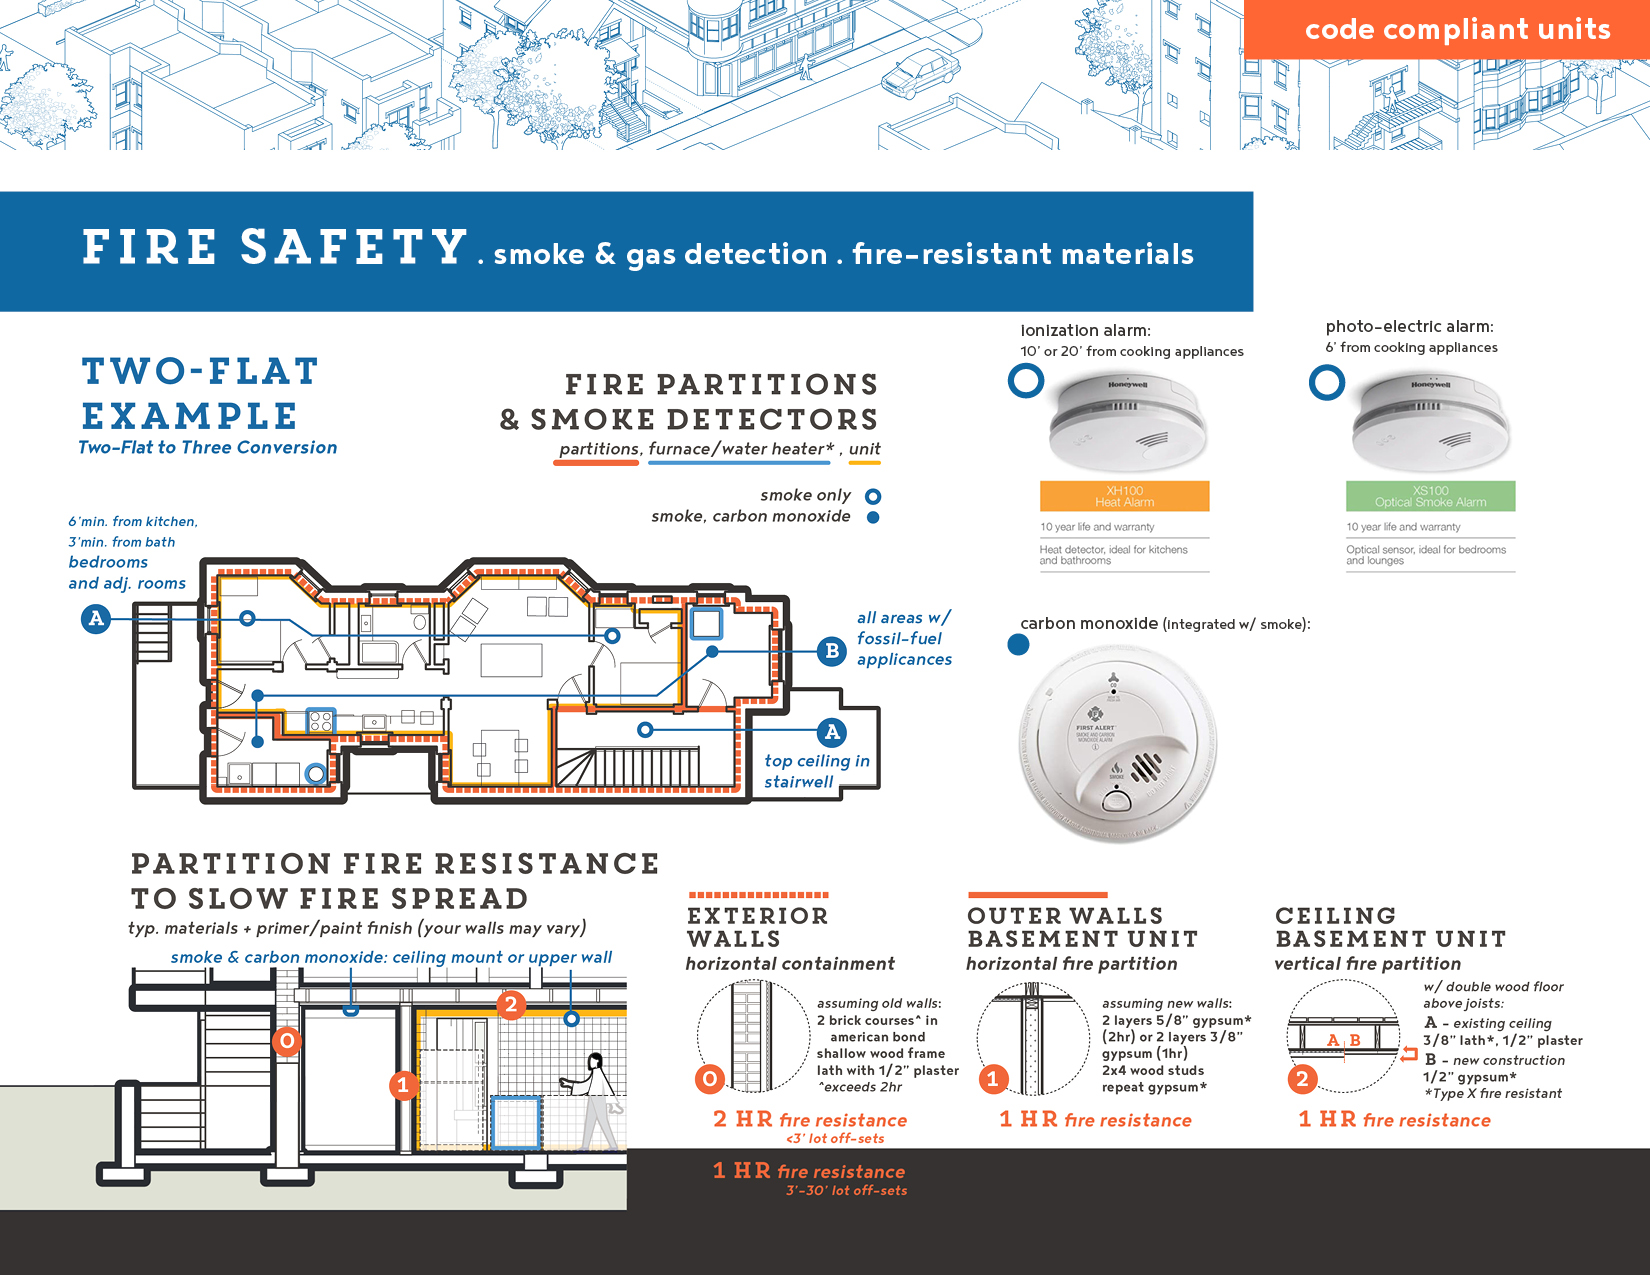
material elements and alarms for fire safety:
In addition to egress, the building code also addresses fire hazards through containment, suppression, and detection systems - ‘fire walls’, sprinklers, and alarms. As you consider a new unit, you’ll want to incorporate, at minimum, containment and detection systems. Small multi-unit residences and Two-Flats are not required to have sprinkler systems.
Containment consists of dividing the building into different zones and building walls or partitions to slow the spread of fire. The partitions are classified by their fire resistance, recorded in ‘burn-time’ or the duration it takes for materials to fail in a fire. In principle, the one or two-hour rated partitions—required between units, ceilings, and surrounding egress corridors—allow time for occupants to hear fire alarms and safely exit.
Fire detection takes the form of smoke detectors. These must be incorporated in your new unit and basement utility areas. While detector placement is fairly simple, alarms should be wired into the building electrical system and connected—if one sounds, they all sound—with placement near the ceiling. If absent, detectors should be added to the existing apartments and stairwells and connected together.
Carbon monoxide alarms should be added near fossil-fuel appliances, such as furnaces, water heaters, and gas stoves. Inefficient or blocked exhaust can put your family at risk for carbon monoxide (CO) poisoning. Carbon monoxide detectors are either stand-alone units or incorporated with smoke detectors and should be installed at ceiling or upper wall height.
documents & resources:
- Chicago Building Code - Chp 7 - Fire and Smoke Protection, Chp 8 - Interior Finishes, Chp 9 - Fire Protection and Life Safety Systems (summarized in drawings)
- Measurements and layout used for sizing, to determine detector placements and verify adequate space for fire partitions
- Architect to confirm anticipated fire partition assemblies and create drawings to apply for construction permits
Is your new unit designed to detect and contain fire:
Does your new unit contain integrated smoke alarms at specified distances from/in bedrooms, bathrooms, and shared stairways (Fire Partitions & Smoke Detectors) ? (14B-9-907.2.10.2)
Note the three types of smoke detectors—heat, smoke, optical—and req. distances from kitchen areas. Does your unit plan accommodate this? (14B-9-907.2.10.3)
Does your new unit contain integrated alarms near fuel-burning appliances (Fire Partitions & Smoke Detectors) ? (14B-9-915, 916)
- This includes carbon-monoxide alarms for gas ovens, furnaces, and water heaters.
Are all the doors and walls along your egress route adequately sized - 5-6” thick for one or two-hour fire partitions? Have you incorporated partition sizing into the calculation of the unit’s exterior walls and ceiling, esp. regarding unit height (Partition Fire Resistance) ? (14B-7-708 partitions, 721 - prescriptive assemblies)
- See prescriptive fire assemblies at 14B-7-721, table 721.1(2)
Residential Zoning
Chicago uses zoning to direct allowable uses and building density. To determine whether you can add a basement unit, find your zoning district at The Chicago Zoning Map and see whether you are in a pilot zone.
Summary: Under current zoning, single family residences in zones RS-3 and higher can add a second unit. Two-Flats in zones RT-3.5 and higher can add a third unit. Within Pilot Zones, owner-occupants can add a unit to homes over 20 years old, with additional constraints.
See zoning details for parking, open space, density, and other building constraints.
Show/Hide Zoning Details
Residential Zoning
The principles of zoning:
Chicago’s initial zoning ordinance was established in 1923 and significantly revised in 1957, aiming to separate incompatible uses and direct neighborhood development. At the scale of your property, zoning regulates a) use: how many units you can have within your building, b) density: how much lot area, parking and open space (lawn, patio) each unit should have, and c) bulk: how far from the lot lines (i.e. offsets) you can build new elements. You’ll need to determine your zoning district (directions below) to make sure you’re able to add another unit to your building. If a unit exceeds allowed use, density, or bulk standards, you can apply to the Department of Planning and Development for an administrative adjustment (see ‘Navigating Permits’).
A zoning district is an area geographically demarcated by the City and coded for allowable uses. To find your district, go to The Chicago Zoning Map and search by your address. Once you have the district code, you can confirm the uses intended by the City (see tables below). To calculate the density of units allowed on your lot - the Floor Area Ratio - you’ll need to know the sum of inhabited areas in your building (right, Building Area) and divide it by area of your lot.
Your zoning designation is defined by a combination of letters (Use Group) and numbers (Use Type). The example at left is in an ‘RT-4’ district. Use Group R covers all residential uses; your building is most likely in an RS (detached housing) or RT (Two-Flat, Townhouse and Multi-Unit) district. Use Type ascends from 1 to 6.5 and signifies allowable density. RS-3 , RT-3.5, and RT 4 allow for two or more flats per property. The zoning tables (next page) then specify additional characteristics. For an RT-4 property, this includes a maximum Floor Area Ratio of 1.2 and minimum lot area of 1650 sq feet, with 1000 sq feet of lot per unit, with additional open space, offsets, and parking requirements, as diagrammed in Prescribed Relationships.
Effective May 1, 2021, in pilot areas’ zoned RS-2 +, the Additional Dwelling Unit ordinance allows for a residential property to add a ‘conversion’ basement unit by right. This applies to buildings over 20 years in age but cannot be built on a property with a carriage house. See pilot details.
documents & resources:
- Zoning for your Lot: The Chicago Zoning Map
- Zoning Ordinance (17-2, 17-10) + Additional Dwelling Units substitute Ordinance (Amendment) (summarized in drawings)
- General dimensions of your lot & building floors as a) lot areas: overall, parking spaces, and open areas, b) distances from your building to lot edges, alleys, and public sidewalks; and c) the gross area of each occupied floor + anticipated basement unit.
Zoning - Citywide
Is your unit allowed under chicago’s zoning?
Hypothetical answers, in blue outlines, are based on RT-4 classification and the Two-Flat + basement conversion on last page. Colors key to example; low saturation = lower density areas (less likely to allow additional units).
Use your site measurements and district classification to see if you can add another unit.
Under current zoning, single family homeowners in areas RS-3 or higher can add a unit to become a two-flat building. Given the small size of many RS-3 Chicago lots, the owners will likely need to get an administrative adjustment from the Department of Building and Planning, to accomodate variances in density, parking, and open space requirements (see 'Navigating Permits').
Likewise by ‘use’, Two-Flat owners in areas RT-3.5 and higher can add an extra unit to become a multi-unit building of 3+ flats. Again, Chicago’s small lot sizes mean you may also need an administrative adjustment for bulk and density issues (see 'Navigating Permits').
The tables on this page apply citywide, outside the ADU pilot areas.
Zoning Code:
note: Hyperlinks connect to code chapter and sub-section (in a new tab). You may to scroll down to reach specific tables or lines, as noted by numbers.1. Does your zoning district permit multiple units or Two-Flats? (17-2-0207)
2. Can you meet the district’s minimum Open Space Requirements with a new unit? (17-2-0307)
3. Does your building meet the district’s Minimum Lot Area per Unit with an additional unit? (17-2-0303)
4. Is your building below the district’s revised maximum Floor Area Ratio (FAR) with an additional unit? (17-2-0304)
5. Can you meet the district’s minimum Parking Requirements with an additional unit (count the new unit)?(17-10-0207, 17-10-1000*) If not, are you in an area designated for transit-oriented reductions (17-10-0102), or could you meet a 50% reduced requirement, by administrative adjustments, to preserve open-space as noted below?
Other Considerations:
- Site Setbacks: While older buildings maybe non-compliant for set-backs (and authorized as such), it is important to consider how much your lot must accomodate for construction and new elements for a basement unit.(17-2-0305) See foundations and site drainage, window wells, and egress for elements with potential set-back conflicts.
- Non-Residential Zones: This checklist only addresses residential use in residential districts. It does not cover live/work units or flats in Business or Commercial zones.
Zoning - ADU Pilot Areas
Is your new basement unit allowed under chicago’s ACU pilot program?
Hypothetical answers, in blue outlines, are based on RT-4.Use your district classification and location to see if you can add another unit. In pilot areas, conversion units can be added by right. Allowable number of units and loosened restrictions are listed below.
pilot area allowances
1. Are you in a pilot area? (Grey diagonal lines = ADU area on Chicago Zoning Map) Additional tools available on ADU microsite.
- North Zone is bounded by Devon, the lakefront, Lawrence, Clarendon, Halsted, Diversey, Lincoln, Belmont, the North Branch of the Chicago River, the North Shore Channel, Peterson, Califomia, Granville, and Seeley.
- Northwest Zone is bounded by the Eisenhower Expressway, Sacramento, Fulton, Damen, Chicago, Western, Hirsch, Rockwell, North, Sacramento, Bloomingdale, Kedzie, Palmer, Kostner, Fullerton, Central Park, Belle Plaine, Lawndale, Montrose, Harding, Lawrence, Kedzie, Elston, California, Fullerton, Western, North, and Ashland.
- West Zone is bounded by the Eisenhower Expressway, Homan, the South Branch of the Chicago River, and 4600 West.
- South Zone is bounded by Cicero, 7500 South Kedzie, 71st St., Halsted. 63rd St., 600 West, 47th St., King, 60th St., Dorchester, 65th St., Cottage Grove, 67th St., the Dan Ryan Expressway, 95th St., Ashland, and 87th St.
- Southeast Zone is bounded by 8300 South, the city limits, Torrence, 95th St., Commercial, 83rd PI., and Houston.
2. West, South, and Southeast Zones: (see ADU Ordinance, p13)
- Are you an owner-occupant of the new unit’s building? This is required for building with less than four units.
- Have less than two (2) other ADU’s been permitted on your block in the current calendar year? Only two, per year, per block are allowed to limit rapid development and adverse rent impacts.
3. Does your zoning district permit multiple units, Two-Flats, or conversion units? (ADU Ordinance, p9)
ADU Ordinance definitions
17-2-0303-C Conversion Unit:
Within Additional Dwelling Unit-Allowed Areas, in the case of building permit applications for the repair, remodeling, or alteration of residential buildings that are located in any RS2. RS3, RT or RM zoning district and that have been in lawful existence for 20 or more years, the density of such residential buildings may be increased in accordance with Section 17-9-0131 by 33% of the number of lawfully established dwellings units, other than conversion units, that have been in existence in the residential building for 20 or more years; provided, however, that if such residential building contains a single dwelling unit, the density of such residential buildings may be increased by one dwelling unit.
If this 33% calculation results in a fractional number, any fractional result of 0.5 or more must be rounded up to the next consecutive whole number.
units are not subject to:
- a) minimum lot area restrictions (#3, citywide zoning),
- b) open space requirements (#2, citywide zoning),
- c) accessory parking requirements (#5, citywide zoning), but
- d) cannot be on the same lot as a carriage house or used for short-term rentals (airbnb, etc.).
additions allowed (rs-2 +):
- Single Family + 1 unit = 2 units total
- Two-Flat + 1 unit = 3 units total
- Three-Flat + 1 unit = 4 units total
- Four-Flat + 1 unit = 5 units total
- Five-Flat + 2 units (1 affordable) = 7 units total
- Six-Flat + 2 units (1 affordable) = 8 units total
Maintenance
Any alteration of a structure that builds out a new unit must comply with the code for new construction. In addition, any existing structures and site areas that are visible to inspectors must meet the ‘Minimum Requirements for Existing Structures.’
Summary: In essence your entire building (and site) must be structurally sound, in good repair, and safe for occupants and neighbors.
See maintenance details for element conditions that indicate need for repair & expert consultation.
Show/Hide Maintenance Details
Maintenance
existing conditions and building maintenance:
You should be aware that any alteration of a structure that builds out a new unit must comply with the code for new construction. In addition, any existing structures that are visible to inspectors must meet the ‘Minimum Requirements for Existing Structures.’ That means that all the elements marked (right, Maintenance Issues) are required by code to be ‘structurally sound and in good repair’.
As shown in the photographs, structural deficiencies can manifest as cracks (loading fatigue), the pulling apart of surfaces (inadequate anchoring), and deteriorating siding, masonry, roofs, and stairs. Even decaying paint and trim, which seems minor, can be an indicator of problems like termite infestations and structural decay (see next page).
All of these conditions would qualify as potentially unsafe. If you see similar deterioration on your building, you should hire an architect to evaluate the structure’s soundness.
Whether or not you decide to add a basement unit, your building should be maintained in safe and sound condition. Tenants, neighbors, or strangers can report visible issues to the Department of Buildings, triggering a code violation and required building inspection.
documents & resources:
- The Chicago Construction Code - Minimum Requirements for Existing Structures (14-X) (summarized in drawings)
- Visual observation - walk around your site and any common spaces - hallways, stairs, the units exterior doors - document issues to repair and/or discuss with consulting architect
- Architect to create an ‘existing conditions’ report if ‘unsafe conditions’ are found by inspectors.
Does your Building have unsafe conditions:
potential structural problems in parenthesis ( )
Homeowners can visually inspect their buildings prior to beginning any construction project, looking for the following:
Do you have visibly unsafe exterior conditions? (14X-3-303)
- A Clogged gutters or downspouts (roof/wall saturation and accelerated decay)
- B Decaying mortar or bricks on parapets or chimneys (wall collapse and falling materials)
- C Non-weather resistant siding and masonry joints with windows or doors (wall saturation and accelerated decay)
- D Exterior walls and foundations that are not anchored, plumb, or free of holes and cracks, windows or frames are not square or operable, floors slope (material failures facing building weight)
- E Unpainted or peeling decorative trim (rot and infestation)
Are units and common spaces adequately secure, with safe exits? (14X-4-304)
- F I Common stairwells lack smoke alarms, have missing treads, handrails, and irregular risers, are < 36” wide (see Egress)
- G Building Entrances lack locks or Unit Doors are missing locks, view holes (basic violation of tenant’s rights)
- H Inoperable windows or windows lacking screens and panes. (violation of tenant’s safety rights; see Ventilation and Light)
- J Water-stained walls and signs of mold (saturation and decay)
Do you have unsafe conditions on your grounds? (14X-3-302)
- K Decking, pathways, or exterior stairs show fatigue and decay (material stress and structural failure)
- L Open areas have standing water (water management failures, see Slab and Waterproofing)
- M Unruly vegetation/untidy garbage areas (infestations potential)
Structure &Foundations
Building assemblies work together to transfer loads - like the weight of materials, furniture, and occupants - down to the foundation and, beneath it, the ground. Standing in your basement, you should examine the exposed overhead joists (ceiling), foundation walls and any columns or interior walls for signs of structural damage that needs repair.
Summary: Structural defects and decay are common in older homes. If you see the issues, discussed in the details, you must consult a structural engineer or architect to assess potential structural failures.
See structural details for common indicators of excess loading and material decay.
Show/Hide Structure & Foundations Details
Existing Structure (Overhead)
general principles for loading and foundations:
Building assemblies work together to transfer loads - like the weight of materials (dead load) or the weight of furniture and occupants (live load) - down to the foundation and, beneath it, the ground. Materials themselves, like soil, resist loading with compressive strength (right, Force Distribution). In addition to gravity, buildings face loading from all directions: wind, pressure exerted by soils and groundwater, and seismic tremors (right, Building Loading). Thus, a stable and safe structure requires multiple types of bracing, so joints and materials can transfer loads without twisting.
From your basement you can likely see much of the structure that is supporting your upper stories, carrying the load from floors, walls, and furniture above (right, Typ. Exposure Structure, A-E). Knowing where the first floor walls sit, you can anticipate where your basement joists are carrying greater dead loads. And, by measuring your foundations, through existing openings, you can estimate whether they are adequately sized to carry typical residential loads.
Before you add a ceiling or interior finishes, you should thus examine the overhead joists, foundation walls and any columns or load-bearing interior walls. Look for stains, strains, and signs of stresses (explored in the following questions) that indicate larger structural problems and material decay.
In fact, if you see any of the defects discussed you should consult a structural engineer or architect to assess potential failures.
documents & resources:
- Chicago Building Code - Chapter 16 - Structural Design, Rehab Chapter 4 - Structural Repairs, Chapter 18 - Soils and Foundations (summarized in drawings)
- Visual observation - walk around your basement and examine walls, columns, joists, and floor above - note spans, cracks, signs of bowing and decay - record issues to discuss with your structural engineer or architect
- Architect and/or Structural Engineer to verify found issues - joist deflection, foundation wall cracks and overturning - and identify loading sources and mitigation options
does your basement show signs of structural fatigue overhead:
Spanning / basement ceiling elements
1 2 Are there signs of excess loading on your joists or girders ? Are your sills and upper walls anchored to your foundation? (14B-16-1604.3, 14B-23-2308.4.2.1, new construction) (14R-4-405.2.4, structural repairs)
- Do your joists exhibit visible bowing and vertical deflection or twisting laterally (right, Joist Deflections)? Any visible bending or diagonal cracks (2, shear) are a sign of excess loading, misaligned joints or deteriorating structure.(14B-16-1604.3)
- Are your joists spanning larger distances than recommended? See diagram D. Long distances and excess spacing can mean each joist is carrying too much load.(14R-4-405.2.4)
- If your basement includes structural columns and girders, do the horizontal pieces show signs of deflection or cracking? Do the columns have decay? (14R-4-405.2.4)
- Are your sills and headers anchored to the foundation C to prevent uplift, lateral sliding, and transfer load to the foundation?
Existing Foundation Walls
Wall Issues
Are there signs of excess pressure from soils, site loads, or uneven settlement beneath the foundation?Note: graphic reference this and next slide (soils).
- 3 - Do your foundation walls either tilt or bow inward? This is a sign that the wall and its footer are failing to resist lateral soil pressure and are at risk of over-turning and collapse. This can be exacerbated by parking machinery near the foundation during construction. It can signal undersized footers, too-thin walls or inadequate anchoring between them.
- 4 - Do your foundation walls have any cracks? These also show that the wall is failing to resist soil pressures, or point pressure from tree roots or sodden areas. Cracks may be long forming or introduced by specific events. Take note of the distribution of cracks: uneven settling will likely have cracks down a wall, across your slab and up the opposite side. Areas of point pressure, like roots or equipment over-loading, will show crack spidering around the area of impact.
- 4.1 - Horizontal cracks, where one area juts into the center of the basement, are signs that specific vertical layers of backfilled soil are exerting uneven, excessive pressure, perhaps from undrained water or compaction.
- 4.2-4.3 - Vertical cracks are signs of uneven settlement of the foundation and underlying soils. One section is adequately supported, while the other area has sunk, with cracks forming between.
- 4.4 - Shear cracks are signs of shifting soils, along the wall surface, which are dragging blocks or bricks with them through friction.
All of these foundation cracks indicate unstable or active soils (to right, Soils: 1 or 5) potentially impacted by ground water and freeze-thaw dynamics. They could also indicate undersized or under-reinforced foundation walls. Consult with an architect or structural engineer for assessment and soil testing.
wall & mortar weathering
Are there signs of brick efflorescence? Are there areas of missing or cracked and crumbling mortar or spalling foundation materials (brick, concrete masonry, or stone)?
- Crumbly mortar and efflorescence both indicate that your walls are saturated with water. In brick, what you’re seeing are the salts leaching out of the bricks as moisture evaporates. Sand-like mortar shows that water was unable to evaporate and broke down the inner adhesion of the materials. Both are often seen next to spalling or cracking brick and block, as those materials absorb moisture, which then expands and contracts based on thermal fluctuations.
This form of decay is just as serious as foundation cracks as it also indicates groundwater and freeze-thaw dynamics. Consult with an architect or structural engineer for assessment and soil testing.
(^ in diagrams = conditions confirmed through soil testing)
Slab & Foundation Drainage
In addition to structural stress, old basement walls and thin concrete slabs permit groundwater and radon seepage. This can spur mold growth, accelerate decay of structure & finishes, and contribute to poor/carcinogenic air quality. Thin slabs will not support new walls and additional loading.
Summary: For the health of occupants, any basement (unit) must be adequately water or damp-proofed, with a slab that has: vapor-barriers, radon exhaust systems, and adequate structural depth.
See Slab & Waterproofing details to learn more about slab structure, joints, and foundation-drainage systems.
Show/Hide Slab & Waterproofing Details
Slab & Foundation Drainage
Managing Moisture & Radon
As you examine your basement, note the condition of the floors and any lingering moisture. Look for cracks, caving, and wear in the slab. Often residential concrete slabs are poured as thin surfaces; they will not support new walls or furniture loads. See code-compliant slab sections, right, and replacement details, in ‘Mitigating Issues,’ associated with adding height, foundation drains, plumbing, and radon exhaust.
On the floors or walls, are surfaces clammy? Can you see condensation on walls or efflorescence on bricks? Are there leaks, in any weather, snaking toward the floor drains? If you ‘finish’ a unit despite these symptoms, this moisture is trapped in the walls and floors, accelerating rot and mold growth. To be safe for inhabitation, your basement unit should be either a) waterproofed or b) dampproofed.
Waterproofed basements are lined with thick, impermeable membranes (Waterproofed: 1) that wrap the foundation walls and the concrete-slab for continuous enclosure. This is required when the basement sits within groundwater and has hydrostatic pressure on the foundations.
Dampproofed basements are lined with thinner materials, which often double as vapor-barriers, because they sit ‘above’ groundwater. This can be the result of natural drainage (Dampproofed: 2). Alternately, the foundations may have a tile drain system (exterior or interior) to intercept water, drain immediate soils and thermally isolate the interior (Dampproofed: 3, Slab StructureF).
documents & resources:
- Chicago Building Code - Chp 18 - Soils and Foundations, Chp 19 - Concrete (summarized in drawings)
- Visual observation - examine basement walls and slab for water, cracks, and wear. Record issues to discuss with technical experts.
- Architect or Structural Engineer to verify found issues and to calculate anticipated slab loads, structure
- Plumber to confirm existing drainage for adaptation; depth, path (straight or with bends), sizes of sewer connections to mains.
is your basement sound, dry, and radon free:
Is your slab intact and adequate for new loads (Slab Structure I)? (14B-19-1907)
- Does it have joints to allow for settling?
- Are there changes - in drainage, loading - requiring replacement?
Does your slab have a vapor-barrier beneath (Slab Structure E, N)?
- Are there venting pipes to exhaust radon away from occupants? (To learn more about the carcinogenic risks of radon and exhaust systems, see ‘Mitigating issues’) (14B-19-1907)
Is your basement visibility dry or are there stains or high-water marks from flooding? Is there damp or waterproofing in place (Waterproofed; Dampproofed)? (14B-18-1805)
- Creating a dry basement will depend on soils, elevation, and geotechnical testing to confirm groundwater control options. See ‘Mitigating Issues’ for how interior and exterior drainage integrates with sump pumps and site grading.
Utility Requirements
A basement unit needs working plumbing, an adequate number of outlets and lights, and thorough heating to maintain a comfortable environment of 68F (at -7F outdoors). Building systems like heating, plumbing, sewage, and electricity should be considered spatially —what can/can’t be appended efficiently— and in terms of loading —like assessing pipe diameters for gas, water supply and drainage or the amperage to support new circuits.
Summary: Single family homes, if adding a unit, are likely to need new plumbing, gas, and electric connections to support utility loads and shared/public usage of common areas. Two to Four-Flats may have extra capacity. Connections (and additional slab work) are fairly expensive and must be considered when budgeting a project (see 'Mitigating Issues').
Expand the Utilities slides to learn more about electric, plumbing, and heating systems, capacities, and constraints.
Systems & Rough Estimates
Electric Plumbing: Water & Sewer Heating: Gas
Existing Utility Connections & Sizing
principles for utility connections & services:
A basement unit needs working plumbing, an adequate number of outlets and lights, and thorough heating to maintain a comfortable environment of 68F (at -7F outdoors). Building systems like heating, plumbing, sewage, and electricity should be considered spatially—what can/can’t be appended efficiently—and in terms of load or capacity—number of fixtures enabled by size or volume of supply. You’ll want to minimize the impact to existing units, so be prepared to work around vertical drainage and potentially align sewer additions along existing overhead lines.
Older buildings are more likely to have inadequate capacity and will require additional lines or resizing sewer/water connections to City utilities (see ‘Mitigating Issues’). You’ll want to incorporate the costs of adding additional meters and lines into your overall estimate ($15,000-$20,000). Segregating systems and/or supplementing existing systems can help avoid underpayment, enable tenants to use utility subsidy programs, and meet livability codes. That said, old buildings often have steam heat or similar systems designed to service all units. Consider how to add supplemental systems to meet code and separate lines, like adding a forced-air heater in the basement, without disturbing the upper stories of existing steam distribution.
It’s also important to understand the elevation and location of sewer lines—either overhead (runs across the basement ceiling) or below the slab (beneath the basement floor). If your sewer connections are overhead, you will need an ejector pump to meet your existing sewage connections. For either system, you’ll need to vent any new connections to release sewer gas and provide maintenance access, like clean-outs and traps (see ejector pump and access details in ‘Mitigating Issues’ ). Your other drainage lines—roof downspouts, areaway drains, and foundation drains—will need a sump pump to lift and carry water away from your foundations (see details in ‘Mitigating Issues’).
As a building owner you can do rough estimates by noting existing connections, meters, fixtures, and lines, as shown in the plumbing, electric, and heating diagrams and tables on the following pages.
You will need an architect to consult with plumbers, electricians, and heating specialists to fully assess the condition of your existing systems and develop an integrated strategy for additional loading and utility connections.
The sample ‘Two-Flat’ system diagrams as well as the system sizing tables (below) are meant to help you feel comfortable integrating existing details and calculations, in order to actively engage trade specialist. Fully calculating the system sizing will need to take into account details like pipe types (for friction), the highest fixture elevation, and total system length for estimating pressure.
documents & resources:
- Chicago Building Code - Chp 12 - Interiors, Chicago Electrical Code - 14E, Chicago - Building Infrastructures Code - Chp 18 - Plumbing and Mechanical Codes
- Visual observation - Note the location of utility connections, meters, and size of any exposed pipes. Determine location and capacity of any heating, electric, or plumbing appliances and fixtures.
- Architect and/or Contractor in coordination with plumber/electrician/heating specialist to assess existing systems and potential for adaptation.
Electric Connections
What do you need for a new unit:
Have you consulted with an electrician about needed capacity?
- Anticipate connecting kitchen appliances and two to four sets of outlets and lights in all rooms, with GFCI outlets in wet areas.
- Given any new layout, occupants will need to access their meters and breakers for maintenance.
- For any multi-unit building, you will need one metered electric service for each unit and one for the public areas - hallways, laundry, stairwells, and fire-escapes.
- With old buildings that lack separated electric, it’s common to replace the entire building’s wiring. Tracing and disentangling old wiring is time consuming and oft confirms the need for replacement. See ‘Mitigating Issues’ for new line options.
Electric loads:
In an electric system, current flows from a power source through a circuit—with appliances and lights that use that power—to a neutral line which carries residual current to the ground. Switches and breakers serve to break circuits and stop electric flow to specific elements or entire lines. Each electric meter tracks the watts pulled in for your unit.
Akin to sizing plumbing or gas loads (below), your electric system is sized to support a set number of appliances per circuit (each rated for wattage). The flow of electric current (in amperes, per circuit breaker) * the differential power (120 or 240V) = total power wattage available per circuit. For safety, most circuits use 60-80% (max) of the available wattage and are properly grounded.
Your electrician will calculate the power drawn and used when adding metered service and circuits. See ‘Mitigating Issues,’ electric details for an example circuit calculation.
Plumbing: Sewer & Water Connections
What do you need for a new unit:
Have you consulted with a plumber about the capacity and location of the sewer system?
- Given an additional kitchen sink, dishwasher, and bathroom fixtures, do you know the current height and diameter of your sewer connections, to anticipate capacity and the need for pumps (18-29-710, 18-29-712)?
- Will your new unit incorporate additional clean-outs, backflow valves, and access panels to facilitate system maintenance and avoid sewage overflows in the lowest level (18-29-708, 18-29-715)?
- Confirm the location, elevation, and direction of your lateral connection - from your basement lines to the sewer main. Any extra elbows in the pipe can act as obstacles.
Have you consulted with a plumber about the capacity and location of the water system?
- Because a new unit requires a full kitchen and bath, you will need an additional or enlarged water connection. This likely won’t be flagged on your permits. Make sure to incorporate line (and meter) addition to avoid belated installation (with all the implied site, slab, and finishing work). See the fixture and pipe sizing calculation at the end of this section.
- Older, single family homes may not be metered. You will want to add meters to new units, but, as with sewage, you can use this method to anticipate the bills/loading for each unit. See the Municipal Code 11-12, Water Supply and Service (11-12-260).
Rough Capacity Estimates: Sewer
You can make an informal tally of plumbing capacity. Make a rough count of all the plumbing fixtures (tubs, toilets, sinks) attached to each of your major vertical drainage pipes and find their drainage values on Table 18-29-709.1 .
- For sewers, measure the pipe size and confirm capacity estimates on Table 18-29-710 A and B. Could you install additional fixtures, given allowed unit values and required 4” pipe beneath ground?
- Add roof drainage (18-29-1108.1) to get a rough sense of your needed drainage capacity.
Rough Capacity Estimates: Water
- For water, make a rough count of all the plumbing fixtures (tubs, toilets, sinks) on Table 18-29-604.10.1 (water).
- Take this fixture total and convert the value into demand (in gallons per minute) on Table 18-29-604.10.2. Find the connection size equivalent for a 100’ system (for steel or copper pipes). (As with the zoning example, highlights match the proposed Two-Flat conversion.)
- Fully calculating the system sizing, esp. for water, will need to take into account additional details like pipe types (for friction), the highest fixture elevation, and total system length for estimating pressure.
Heating: Gas Connections
What else must you account for with Utilities?
Does the plan for your basement unit account for the interconnection of different building infrastructure/services? Most building systems involve multiple connections and negotation with walls and structure. Consider the following examples:
- Fossil-fuel burning heaters (water heaters, forced-air units) require intakes, exhausts, and heat distribution systems. (See ventilation in ‘Mitigating Issues’)
- Drainage pumps typically connect to your storm/sewer mains but also require two power circuits, which act as fail-safes (18-29-712).(See drainage and plumbing in ‘Mitigating Issues’.)
Because of such interconnections, planning a new unit should be done with professionals, given their assessment of existing building systems.
Rough Capacity Estimates: Gas Heat
Akin to plumbing, gas is distributed through a series of pressurized pipes, as diagrammed on page 80. Broadly speaking, gas lines step down in size. A larger capacity and diameter pipe supplies the meters. This splits to serve distinct unit lines and branches internally, with each new section serving fewer appliances, thus requiring less fuel and smaller diameter piping.
As with water flow, you can estimate existing gas flow and current pipes’ capacity to support extra appliances. Make a rough count of your gas appliances (range, dryer, etc.) and find their typical fuel usage in cubic feet, on Table Appliance Fuel Usage. Sum these values to estimate current gas usage, in cubic feet.
To calculate the necessary connection size, measure the distance from your meter to the furthest gas appliance. In the example, this would be the second floor gas range which is approximately 95’ from the meter. Find this length on the Table Gas Pipe Capacity (round up as necessary) and find the column, moving right, that matches or just exceeds the usage sum (305 ft3/hr in the example). At the top of the column is your estimated gas connection size, at the meter.
If your current piping matches the nominal pipe size and your fixture usage sum is less, you likely have capacity for heating upgrades or new appliances. Use the Table Appliance Fuel Usage to estimate viable additions.
Reminder: All rough utility estimates should be followed by strenuous professional assessments to confirm capacity and work required for a new unit.
Proposed Utility Connections & Sizing
Sample Unit: Proposed Utility Updates
Building upon the existing systems, this spread suggests likely adaptations and interventions in a Two-Flat basement. As much as possible, placement of new plumbing fixtures have aligned with existing water and sewer lines for service, drainage, and exhausting sewage gas. Assuming separated service between public spaces, first, and second floor units, the existing basement circuit is kept for public use and a new electric system is added for the basement unit interior. Heating connections are left as is, given overhead steam-lines and radiators, which are common in older, multi-flat units.
Height & Area Requirements
It is critical to make sure your basement has enough room for a decent and legal apartment. You'll want nearly 8' in an unfinished space to create a 7' tall unit without excavating around your foundation (expensive, risky). Likewise, you will need to have ~400-500 sqft to carve out required bedroom, living, kitchen, and bath spaces.
Summary: Height is a common limitation to developing a basement unit (7' finished) and affects the ability to create adequate spaces, light, and ventilation opportunities (next section).
See details for required height and area, by room.
Show/Hide Size & Height Details
Interior Height & Area Minimums
Principles behind height and size requirements:
It is critical to make sure your basement has enough height and area for a decent and legal apartment. The required dimensions are minimums meant to avoid overcrowding.
Unfinished basement height should be nearly 8 feet, on average, to allow for upright posture, accommodate building materials, and avoid pipes acting as obstacles to movement (Minimum Req. Room Heights). As you measure, leave a foot margin for insulation and finishing on floors and ceilings (Measuring Room Heights). (14B-12-1207)
Room areas should be between 60-120 square feet (min.), ideally fitting between existing, load-bearing structures like columns and walls. Make sure to leave common areas, for access to breaker boxes, meters, and laundry, as you carve out space. (14B-12-1207)
For comparison, measure your existing units to understand room sizes. On your slab, use chalk to ‘draw’ out walls (~6” thick), doors, and typical furniture; can you navigate comfortably in these imagined spaces? Ultimately your architect will work to refine and develop any new unit’s layout and coordinate building systems updates.
documents & resources:
- Chicago Building Code - Chp 12 - Interiors
- Measurements - current basement size, with interior dimensions wall to wall, floor to ceiling
- Sketch of new unit with room designations - see also air/light, egress, utility connections, and structure, which may impact layout
- Architect to ultimately draw and stamp the final plans for your new unit, in order to apply for construction permits
do you have the space for a new unit:
Does your basement have adequate ceiling heights for a new unit (Minimum Req. Room Heights)? (14B-12-1207.2 - exception 1)
Does your planned kitchen have decent workspace at the counters (Min. Room Areas: C) ?(14B-12-1207.1)
- If accessibility is a concern, 30-36” workspaces should include lower cabinets, grab bars, and wheelchair turning radii. See Accessibility Code for Dwelling Units (14B-11-1107).
- The kitchen (or living) may also include the 60 sqft dining area.
Are your main living, sleeping, and dining rooms adequate to meet the minimal area standards at right (Min. Room Areas: D, E, F)? (14B-12-1207.3)
- The required bathroom fixtures - a sink, toilet, shower/tub - will determine the minimal areas in a bathroom. (Min. Room Areas: B)
Light & Ventilation Requirements
It is imperative that any new basement unit meets or exceeds the code’s ventilation and lighting requirements (approx. window areas = 4% (air) and 8% (light) of room area, with use & adjacency allowances). Sheltered at/below grade, basements often have small windows, poor air circulation, and excess humidity. Combined, these factors foster condensation and mold, degrading materials and threatening the tenant health.
Summary: Inadequate natural ventilation and light is common in basements, with window and vent placement constrained by structural loading and property boundaries. If you have a dark or dank cellar, consult with a heating/ventilation specialist and structural engineer to determine options for making a dry, light interior.
See details for specific exposure areas.
Show/Hide Light & Ventilation Details
Light & Ventilation Area Minimums
Principles behind light and ventilation requirements:
It is imperative that any new basement unit meets or exceeds the code’s ventilation and lighting requirements (left, Min. Light & Air). Sheltered at/below grade, basements often have small windows, poor air circulation, and excess humidity. Combined, these factors foster condensation and mold. Adequate ventilation and light combats mold and mildew, and improves quality of life. Your architect will confirm air and light calculations and coordinate with specialists. That said, you can anticipate potential issues and estimate for compliance by making a few measurements using the metrics noted below.
Natural light is easy to estimate. (right, Calculating Air & Light Exposure) Measure the area of windows currently in your basement and pair them with anticipated room sizes. For adequate daylight, the area of windows in any room must be at least 8% of the floor area (note indirect light/adjacent room options for high ceiling areas)(14B-12-1204.2.4). An electrician can estimate artificial light levels for access stairwells and new rooms.
To estimate natural ventilation, imagine all the measured windows open (50% area for air flow) and calculate as you did above(14B-12-1202.5). Do you have 4% of air-flow area per each room area? To informally check for excess humidity, tape tinfoil to the walls (all edges) and, after two days, check for water. Moisture on the wall indicates waterproofing issues; moisture on the exposed side shows condensation. As air movement, condensation, and evaporation rely on cross-ventilation (facing windows) and air-pressure dynamics, you should hire a ventilation professional to confirm the rate of passive air change—how long it takes for all new air to enter a space with windows closed—and advise on mechanical ventilation and dehumidification.
See openings section, in ‘Mitigating Issues’ for constraints in adding foundation windows.
documents & resources:
- Chicago Building Code - Chp 12 - Interior Environment
- Measurements and layout used for sizing + measurement of ground level and offsets, as limits window well sizes
- Mechanical/Heating professional to perform blower tests (14B-12-1202.1 exception 1) and install vents, Electrician to assess artificial light levels
- Architect to confirm calculations, coordinate w/ tech.professionals
do you have air and light for a new unit:
Does your basement have adequate natural light for residential use (Min. Light & Air)? (14B-12-1204.2.4)
- 8% for all rooms, or 8% average if counting indirect lighting
Have you confirmed adequate artificial light with an electrician? (14B-12-1204.3)
- Room lights must provide 10 footcandles, at 30” h
- Stairwell lights must provide 1 footcandle on treads
Does your basement have adequate natural ventilation, in all seasons (Min. Light & Air)? (14B-12-1202.5)
- 4% for all areas, calculated by room or averages
- 5 air-changes per hour by infiltration
Do your new bathroom(s), kitchen, and laundry rooms have mechanical ventilation? (14B-12-1202.1)
- Fans must have openings of 1.5% * area of the room they ventilate.
If you need to increase window areas, do you have space for window wells (Exterior Light Wells)? (14B-12-1204.2.6)
- Can you add light wells (1.5:1 ratio) within your lot?
Egress & Fire Exits
Fire safety is a key aspect of building code. In your new unit, all rooms must allow for egress, i.e. that all occupants can efficiently leave the building in an emergency. Broadly, the code requires paths within halls or stairs that are a) built of fire resistant materials (next section) and b) facilitate the unobstructed movement of occupants outward.
Summary: For smaller multi-unit buildings, the code specifies number of unit exits (one to two) and distances to exits (60' max) in order to limit lethal accidents.
See details for exit system components and requirements for exit stairs, halls, and doors.
Show/Hide Egress & Fire Exit Details
Fire Egress: Exits & Pathways
Fire egress (i.e. exit) elements
Fire safety is a key aspect of building code. As you layout your new unit, you’ll want to make sure all rooms allow for egress, i.e. that all occupants can efficiently leave the building in an emergency. Broadly, the code requires paths within halls or stairs that are a) built of fire resistant materials (see next page) and b) facilitate the unobstructed movement of occupants outward.
As noted in ‘Egress Components,’ an egress system has three parts to consider:
- Egress routes: pathways to an exit from within a building, passing through units, common areas, and stairs. The code specifies ‘travel distance’ as the longest distance allowed between the opposite corner of a unit to an exterior exit, as a human would walk.
- Exits: building exits are located on the exterior walls and release occupants to the outside. Exits can include exterior stairs, which connect with the ground, or ‘horizontal’ exits that release occupants at grade.
- Discharge: pathways from an exit to the street or alley at the edges of a property. Residential discharge paths can have locking gates at the edges of a property.
documents & resources:
- Chicago Building Code - Chp 10 - Means of Egress (summarized in drawings)
- Measurements and layout used for sizing to determine egress pathways and travel distances (see also air/light, utility connections, and structure as those elements may impact paths and hallway placement)
do you have needed fire exits:
Does your basement unit have a direct exit, from within the unit, or two exits via common hallways? (14B-10-1006.2.1, 14B-10-1006.3.2, 14B-10-1006.3.3)
- If planning additional exit doors, they are required to be at opposite ends of residential buildings.
- The same physical concerns apply to adding doors to foundations, as when adding windows (with 3’ exit landings in place of window well requirements).
Is at least one route of travel under 60’ (no sprinklers) or 75’ (with sprinklers):
- Measure the distance of travel from the furthest corner of the furthest room opposite the exit.
- For paths on stairs, measure on a diagonal, parallel to the steps, along the staircase center.
- Routes of egress can not cut through bedrooms or bathrooms from other rooms, due to their locking doors.
Are all the passages and doors along your egress route adequately sized - both within unit and in common spaces (Egress Route Sizing)? (14B-10-1003.3.1, 14B-10-1003.5)
- If space does not permit, you may retain older, steeper stairs but with adequate railings and clear space.
- If your basement is lower than adjacent exits and areaways, it is permissable to have two steps up (max) to exit a story.
As you consider the impacts, beyond a single unit, ask yourself the following:
- Are the egress systems in your building adequate for all residental units?
- Have you considered how new, exterior exit doors might integrate with your foundation walls and site?
Fire Safety
In addition to egress, the building code also addresses fire hazards through containment, suppression, and detection systems - ‘fire walls’, sprinklers, and alarms. A new unit must incorporate, at minimum, containment and detection systems. Small multi-unit residences and Two-Flats are not required to have sprinkler systems.
Summary: You will need to have fire partitions between units and common areas, as well as a number of smoke and carbon monoxide alarms within units and stairwells.
See details for alarm requirements and burn-resistance of partitions.
Show/Hide Fire Safety Details
Fire safety: Alarms & Containment
material elements and alarms for fire safety:
In addition to egress, the building code also addresses fire hazards through containment, suppression, and detection systems - ‘fire walls’, sprinklers, and alarms. As you consider a new unit, you’ll want to incorporate, at minimum, containment and detection systems. Small multi-unit residences and Two-Flats are not required to have sprinkler systems.
Containment consists of dividing the building into different zones and building walls or partitions to slow the spread of fire. The partitions are classified by their fire resistance, recorded in ‘burn-time’ or the duration it takes for materials to fail in a fire. In principle, the one or two-hour rated partitions—required between units, ceilings, and surrounding egress corridors—allow time for occupants to hear fire alarms and safely exit.
Fire detection takes the form of smoke detectors. These must be incorporated in your new unit and basement utility areas. While detector placement is fairly simple, alarms should be wired into the building electrical system and connected—if one sounds, they all sound—with placement near the ceiling. If absent, detectors should be added to the existing apartments and stairwells and connected together.
Carbon monoxide alarms should be added near fossil-fuel appliances, such as furnaces, water heaters, and gas stoves. Inefficient or blocked exhaust can put your family at risk for carbon monoxide (CO) poisoning. Carbon monoxide detectors are either stand-alone units or incorporated with smoke detectors and should be installed at ceiling or upper wall height.
documents & resources:
- Chicago Building Code - Chp 7 - Fire and Smoke Protection, Chp 8 - Interior Finishes, Chp 9 - Fire Protection and Life Safety Systems (summarized in drawings)
- Measurements and layout used for sizing, to determine detector placements and verify adequate space for fire partitions
- Architect to confirm anticipated fire partition assemblies and create drawings to apply for construction permits
Is your new unit designed to detect and contain fire:
Does your new unit contain integrated smoke alarms at specified distances from/in bedrooms, bathrooms, and shared stairways (Fire Partitions & Smoke Detectors) ? (14B-9-907.2.10.2)
Note the three types of smoke detectors—heat, smoke, optical—and req. distances from kitchen areas. Does your unit plan accommodate this? (14B-9-907.2.10.3)
Does your new unit contain integrated alarms near fuel-burning appliances (Fire Partitions & Smoke Detectors) ? (14B-9-915, 916)
- This includes carbon-monoxide alarms for gas ovens, furnaces, and water heaters.
Are all the doors and walls along your egress route adequately sized - 5-6” thick for one or two-hour fire partitions? Have you incorporated partition sizing into the calculation of the unit’s exterior walls and ceiling, esp. regarding unit height (Partition Fire Resistance) ? (14B-7-708 partitions, 721 - prescriptive assemblies)
- See prescriptive fire assemblies at 14B-7-721, table 721.1(2)